Pages
▼
Thursday, March 26, 2009
POTATO ROTI
This is the best roti ever! Hands down. The sweet and spicy potato filling is encased in a thin, crispy almost paper like parchment and the combination is exquisitely delicious. I just wish I had made this 200 years ago because the recipe has been sitting on my shelf for almost 250 years.
I have a collection of the Australian Women's Weekly Cookbook collection because I love the photographs and the fact that they are cheap in comparison to all those fancy schamancy cheffy cookbooks that are thick, heavy and scary. Yes, I like simple, everyday, rustic, plain, no-fuss food, with ingredients that I can relate to and that give me a full plate of food in just one course. Minus the dessert of course. That's what I call a meal. My thanks to the Australian Women's Weekly. Don't they (the roti) look good!
So take my hand and I'll take you on a one way trip to Potato Roti. It's easy, it's quick, it's fun and it's so good that you'll never want look back. Promise.
Here's the recipe..............
1 cup wholemeal flour ( I used plain flour as I didn't have wholemeal)
1 cup white plain flour
1/2 tsp salt
100 gm ghee
1/2 cup (125 ml) water, approx
100 gm ghee (I used cooking oil)
Filling......(I made slight changes)
1 large potato (300 gm)
1/2 small sweet potato (125 gm) I didnt measure this, I used a large one
1 tsp coriander powder
1/2 tsp cumin powder (I used 1 tsp)
1/2 tsp cayenne pepper
1/4 cup tightly packed coriander leaves (I didn't use as much)
Sift flours and salt into a large bowl, rub in ghee. Stir in almost all the water first and if not enough then finish it all. The ingredients should just cling together. Turn onto floured board, knead about 10 minutes or until smooth.
Divide dough into 16 portions, roll each portion on floured surface into 16 cm round and stack them with cling film in between each or you can do 2 at a time, fill with the potato filling that has been divided into 8 portions, spreading the filling out leaving a 1/2 inch margin all around..............
Brush edges with water and top with the other piece of rolled out dough. Like so..........
Place on a plate and cover with plastic wrap or baking paper while you fininsh off the rest of the dough and filling. Use plastic wrap/baking paper between each layer to keep from sticking.
When done all, heat a frying pan , put in some oil, about a tablespoon and fry the roti until crisp and golden brown on both sides. Add in oil each time for a new roti so that it is fries to a crisp. When done you could cut them into quarters or eights or serve whole with some curry. I served them with a potato curry. YUMMMMM.
Filling..........
Steam the potatoes until tender. Mash coarsely and stir in the spices and corainder and mix well. Taste for salt. Use as above.
Make 8 rotis and can serve 8 people. Serve hot or warm.
Tuesday, March 24, 2009
PANDAN TRUFFLES - ONDEH-ONDEH
If your mother/wife/husband/MIL/boss nags you serve them these. Good way to silence them for a while. Serve them a whole plate and they'll be quiet for an even longer time. Sticky, gooey, stretchy and delicious it will keep them quiet for more reasons than one.
This is a Malay confection made from glutinous rice flour coloured green from the juice of pandan leaves (South East Asia's answer to vanilla). Filled with a sweet burst of a rich, dark, coconut palm sugar syrup, boiled in water until it floats to the surface and then rolled in lightly salted shredded coconut it makes a wonderfully soft, sticky, gooey, stretchy sweet that is utterly delicious. Place them in pretty paper cases instead of piling them up like a stack of cannon balls and they are food fit for a princess, prince, king or queen.
Thank god I found a dainty way to serve this. These are usually served like a pile of rocks in Malaysia. With the paper cases cradling them they would be a lot less messy to eat too especially if you bite through them (a method of eating that is not recommended). The safest (and less embarrassing) way to eat this is to pop the whole darn thing into your mouth, give it a good bite, feel the syrup squirt all over the insides of your mouth and work your jaw really hard. Make sure you oiled your jaw joints first. And make sure you have real god given teeth. Dentures, no matter what make or model, will clack and clatter that you'll regret ever having had dentures or having bitten into these innocent looking ondeh-ondeh.
These are what they look like inside. These things squirt!
These confections are best made on the smaller side so that they can be popped into the mouth whole. Ideal if you don't want sugar dripping down your shirt or squirting on your friend across the table.
* Best eaten by teenagers and adults only. If little children eat these watch them(the children) carefully or cut them(the truffles) up into little pieces first. Like fish balls when eaten whole there is potential for choking.
Little devils these things are. But Yum!
Here's the recipe..............
2 cups glutinous rice flour
150 ml pandan juice (4 or 5 pandan leaves blended in a blender with 150 amount of water and strained)
a small bowl of finely chopped palm sugar or muscovado sugar (you really don't need much)
some coarsely shredded coconut or dessicated coconut if you can't get fresh.
salt
Mix the flour and pandan juice and work it through until you get a firm dough. If too dry add a little water. If too wet add a little flour. Your dough should not be sticky. In fact it should be very firm and maybe on the drier side. If its too dry as you roll them just wet your palm a little and continue.
Get a pot of water to boil on the stove before you do the rolling and filling.
Pinch off some dough. Roll it into a round ball between your palms and then flatten it into a circle or bowl shape. Using a teaspoon scoop some finely chopped sugar into the 'bowl' and seal and roll again into a smooth ball.
Coconut palm sugar sold in discs.
Place the uncooked sugar balls on a plate until you have several pieces and then drop them into the boiling water and let them boil until they float to the surface. Meanwhile make some more until the dough is finished.
When the balls of dough float to the top pick them up with a 'spider web' /strainer and drain. Roll them immediately in a bowl of lightly salted shredded coconut.
Place in paper cases. Serve cold, not chilled but cold. Serves three or four.
Monday, March 23, 2009
SOUR CREAM CHEESE ROLL
This bread requires almost no kneading. As if that isn't good enough it is also very tender, soft and buttery. Spread it with cheese, roll it up and seal the ends or spread it with butter, sprinkle some brown sugar and cinnamon and choc chips and roll it up and slice and you will get a cheese roll or chocolate cinnamon buns.
Either way it tastes incredibly good and makes a great breakfast or tea time treat.
I'm a little divided by this recipe. I was googling along on one of those never ending googling and butt-glued-to-chair and nobody-else-exists days and I came across this blog with a recipe for Cream Cheese Danish. It looked incredibly droolsome and so I booked marked it hoping to make it one day.
Then I one day my eyes strayed and fell upon a recipe card I had left in the all-kinds-of-things basket on my kitchen table and I picked it up. It was a recipe for a sour cream bread dough with cream cheese filling given me by my daughter years ago. She had gotten it from the internet. I had been meaning to make it one day.
So one day, which is today, I made them both. They were the exact same recipe.
But I am going to credit Thibeault's Table for I have used her method of rolling up the cheese spread dough and baking it the way she did and I am also going to credit my daughter for giving me the recipe which also means I am also going to credit the person who posted the recipe on the internet some 7 years ago for my daughter to find it. Thank you, thank you and thank you.
I should have rolled it tighter........... Mmmmm nice and cheesy in there!
Now for the recipe..............................
Dough.......
1 cup sour cream
1/2 cup butter, softened
1/2 cup sugar
1 tsp salt
2 tabsp dry yeast
1/2 cup lukewarm water
2 eggs
4 -4 1/2 cups bread flour
Filling :
3/4 cup sugar
16 oz cream cheese
1 egg
2 tsp vanilla essence
Make the bread dough ...........
Heat sour cream and butter until the butter melts. Stir in the sugar and salt. Stir until the sugar dissolves and take it off the heat and let cool. Sprinkle yeast in the warm water and stir to dissolve. Mix sour cream butter mixture with eggs and yeast mixture and pour all into the flour. Use a fork to mix into very soft dough. Leave to rise for an hour or more until double in size of leave in the fridge overnight.
Once risen take the dough out from the bowl nad knead gently six or seven times. Divide dough into 4 equal parts. let rest for 15 minutes then take 1 portion and roll out to a rectangle about 11-12 inches by 7-8 inches. Spread the dough sheet with 1/4 portion of the cream cheese filling leaving about an inch margin all round the sides. Roll up like a swiss roll firmly from the wider edge and seal the joint and also seal the 2 ends so the cheese filling will not ooze out during baking. Flatten the roll a little. Place on a baking tray and do the same for the other 3 dough portions. Make 4 or 5 X's across each log of dough and brush with beaten egg to glaze. Let rise for about an hour until twice its size. Bake in a 180 C oven for 25 minutes.
*The dough can also be swiped with butter, sprinkled with brown sugar, cinnamon and chocolate chips like in the picture below and then rolled up like a swiss-roll and sliced into portions 2 inches wide and baked about 20 minutes to make cinnamon buns. I'm afraid I did not get to take a picture of the cinnamon buns after they were baked. But we all know what they would look like don't we?
Make the filling while the bread dough is doing it's first rising..........
Beat all ingredients for filling in a mixer machine or by hand until lump free and smooth. Keep aside until required.
Tip : Do not beat cheese first and then add the sugar etc. Beat them all together at once otherwise the mixture will be too runny and soft.
Thursday, March 19, 2009
APPLE MUFFINS
Muffins are cute. They don't need to be iced or decorated to look good and are SO easy to make and are SO good if made properly and are SO pretty if filled in cute paper cups and are, I believe, a tad healthier than cupcakes. Well tad or not, I just had to make some today because I came across some very cute and adorable paper cupcake cases and they just made me fall apart. If there is anything that will make me do anything they are flower prints. I would die for them. So it looks like I'll be making a whole lot of muffins or cupcakes for the next few weeks because I now have 192 cute and adorable cupcake cases waiting to be used. That was the smallest pack for sale and being me I just had to buy them.
These muffins are very tender, very moist and just nice sweet with bits of apple in every bite. The cinnamon in the streusel topping finishes it off beautifully. Lovely lovely puffin muffins! For breakfast, tea or in between. This recipe makes 8 muffins.
The recipe......
2 cups plain flour
1 tbsp baking powder
a pinch of salt
1/2 cup granulated sugar
1 egg
1 cup fresh milk
4 oz butter, melted and cooled
1 red or green apple chopped coarsely
Topping mixture :
1/2 cup plain flour
1/4 cup brown sugar
1/2 tsp baking powder
1/2 - 1 tsp cinnamon powder
a handful of walnuts chopped medium fine
Make topping first....
Combine all ingredients for streusel and rub in the butter with finger tips until like breadcrumbs. Keep aside.
Make muffins.....
Combine flour, baking powder and salt in medium bowl and mix well. put in the chopped apples and mix a little.
In another bowl beat egg and sugar until combine. Pour in milk and mix. Add melted butter and mix again.
Add wet mixture to dry mixture and mix with a fork or a spatula. Stir until just mixed and the texture of the mixture looks like curdled or rancid milk with bit o flour still visible. DO NOT over mix or your muffins will be tough because the gluten in the flour would have been activated.
Scoop mixture into a muffin tin lined with paper cases until almost full. Top with streusel mixture and bake in 200 C oven for 10 minutes and then turn down the temperature to 180C and bake another 10n minutes.
SAMBAL LADA TEMPEH - CHILLIE TEMPEH
Another vegetarian/vegan dish. Absolutely delicious but be prepared for a bit of a bite on your tongue especially if you use bird chillies instead. Tempeh is made from fermented soya beans left somewhat whole and shaped into flat cakes. When bought it feels warm due to the fermentation process. Sliced into strips, seasoned with salt and fried until golden brown it makes a thoroughly scrumptious and healthy snack except for the fact that it is fried of course. But then you could always use olive oil or grape seed oil to clear your conscience.
The white on the right is how the tempeh looks before being fried and those on the left have been fried.
The chillies in this dish are pounded with the onions and when fried in a little oil until slightly caramelized a lovely sweetness emanates which is then tempered with the sourness of tamarind juice. After some stir frying it results in a balance of a gentle sweetness coupled with a subtle sourness that, however, may or may not be overwhelmed completely by the spicy and fiery heat of the chillies that you use.
The choice is yours. Either remove the seeds and use the less spicy large red chillies or live dangerously and use a handful of bird chillies or go for half and half.
The recipe......
280 gm tempeh, sliced and fried until golden brown
About 4- 5 large red chillies or a mixture of red and green
4 -5 shallots
2 cloves garlic
1 tsp tamarind paste mixed with 1/4 cup water, juice extracted
A handful of small cherry tomatoes
salt
3-4 tbsp cooking oil
Chop up the chillies and slice the shallots. Pound in a pestle and mortar the chillies, onions and garlic until it becomes a course paste. It does not need to be pounded finely.
Heat oil in pan and stir fry the pounded paste until fragrant and slightly caramelized. Add the tamarind juice, salt and the cherry tomatoes and cook until the tomatoes are soft and somewhat squashed. Throw in the fried tempeh slices and stir to combine well. Taste for salt. At this point you may add a pinch of sugar if you like. I like. But if my mother knew she certainly wouldn't.
In my opinion (since I have one) a pinch of sugar in savory dishes like a pinch of salt in sweet cakes brings out the flavour and adds that little extra flavour to a savoury dish and sweet one.
Monday, March 16, 2009
MUFFINS WITH A STREUSEL TOPPING
The most exasperating thing, for me, about making muffins is when they don't dome. It drives me nuts when they don't dome (enough). And nothing could make me feel worse than when I step into a Starbucks and one of the first things that greet me are their ridiculously domed muffins.
Their muffins are so domed that I was discouraged from making muffins for a time. I had became so envious of their domed muffins that all I did when I went there was to drop my jaw, hurry home, check out some muffin recipes, test them out and having achieved less than perfect domes I simply went back there and gawked again.
I scrutinized the edges, inspected them, furrowed my eyebrows and then one day I had the AHA! moment. I realized, finally, that Starbucks have, very, very sneakily, used custom made muffin tins in which they have had 'steps' installed. Ones that rimmed over, above and around the rims of the normal muffin moulds which elevated the edges of all their muffins one step higher, tricking us into seeing and believing that their little/huge muffins were oh so very, very domed. Smart little alecs! I thought.
Just to be certain that I wasn't just imagining this, out of the envy that was burning a hole in my heart, I went back there yet again, goggled stupidly at them muffins and trotted back home completely satisfied. Yup! it was the mould all right! I drew a cross-section of a Starbucks muffin in my little notebook, showed it to my children and I convinced them vehemently that it was the mould, all in the mould and nothing but the mould. I rested my case. Now just in case you were thinking that this is all a made up story for the sake of being silly let me tell you that it isn't. Baking activates the nutty in me and I let nothing surpass me. Not even an unbelievably domed Starbucks muffin.
So this is a pretty good if not a very good muffin recipe extracted from about.com. Its plain vanilla but with a very lovely streusel topping that adds a just right sweet edge to every bite. Very YUM!
But I can't stress enough how important it is to never overmix the muffin mixture. It does make a lot of difference to its tenderness after its baked. The mixture that I mixed looked like curdled/rancid milk with some lumps of not quite mixed in flour. But that was good, I was told, ugly but good. And so it was. And the muffins turned out beautifully domed. As domed as a dome that a common muffin tin could produce. Makes 8 muffins.
The recipe....
2 cups all purpose flour
1/2 cup granulated sugar
1 Tbsp baking powder
1/2 tsp salt1 cup whole milk
1 tsp vanilla essence
1 large egg
4 oz butter, melted and cooled
Sift and mix dry ingredients. Beat eggs and sugar in another bowl. Add vanilla. Add cooled, melted butter to the egg-milk mixture bit by bit until incorporated.
Add liquid mixture to dry ingredients using a fork or spatula until just incorporated but not smooth. Let it be lumpy with some bits of flour still visible. That's is perfectly ok. Spoon immediately into muffin tins almost filling the paper cases or muffin tins. You'll get about 8 muffins. Sprinkle the tops of each muffin with the streusel mixture and bake in a pre-heated oven at 200 C for the first 10 minutes and 180 C last 10 minutes.
PS : Filling the tins almost full (more than 3/4 full) and baking them at a high temperature for the first ten minutes helps in getting them nice and domed. Don't forget to turn the temperature down after that otherwise your muffins will be dry and overbaked!
Streusel mixture :
1/2 cup plain flour
1/4 cup brown sugar
2 oz butter
1/2 tsp ground cinnamon
Mix all ingredients together until like breadcrumbs. Sprinkle on top of muffins just before baking them.
Friday, March 13, 2009
TWO POTATO ROSTI
This will teach me never to skim through recipes again. Read Zurin read. Don't skim. Don't gawk at pictures. Read. Finally that was what I did after the first rosti I made tasted rather crappy. I had the nagging feeling that I should have boiled the potatoes first, should have thrown in all those herbs and of course the garlic. How could I forget the garlic! But that was after, when regret sinks in, when it makes you ponder and when a pin of light becomes visible in the distant end of the tunnel to my kitchen.
So I made this twice today. A tasteless one for lunch and a very, very tasty one for dinner. I heart garlic. It makes so much difference. I heart herbs. They give so much flavour. And I heart Rosti. Oh and I heart sweet potaotes too.
Rosti seems such a simple thing to make but I found out was quite, quite hard to get out of the pan in one piece especially if you do not use a non-stick. I had trouble there but a little patching up did the job.
I got this recipe from "The ultimate potato cookbook" but I tweaked it a little by replacing half of the potatoes with sweet ptoatoes and I added an egg to bind the mixture together.
The recipe..........
650 gm of waxy potatoes combined with sweet potatoes (I used two medium normal potatoes and I large sweet potato), steamed and cooled completely.
1 egg
2 cloves garlic
2-3 tbspn chopped white onion
1 tbspn dried parsely
1 tsp dried oregano
1 tsp fresh thyme
1/2 tsp salt
pepper
2 tbsp butter
1 -2 tbsp cooking oil
Grate the potatoes. I used a knife to flake the sweet potatoes because it was too soft to be grated. Put them into a bowl.
Chop the onion, garlic and fresh thyme.
Saute the onion and garlic in a frying pan until soft. Add them to the potatoes in a bowl. Add in the rest of the herbs, 1/2 tsp of salt and pepper and lastly the egg. Mix to bind well.
Heat up a medium frying pan until hot. Put in 1 tbspn of oil and the tablespoon of butter. When the butter melts put in the potato mixture and flatten it using a spatula or a fork. Using a spatula round the edges by patting gently.
Cook on medium heat for about 8 minutes until a crust forms on the base. Shake the pan occasionally to loosen the rosti. Take it off the heat. Place a large enough plate over the pan and invert the rosti onto the plate.
Heat up the pan again, put in 1 tablespoon of oil and the remaining butter until the butter melts and then slide the rosti into the pan, uncooked side down. Cook again for 6 -8 minutes until the base is crusty. Serve hot, cut into wedges.
Thursday, March 12, 2009
EGGLESS JELLY CREME CARAMEL
This is the most exciting thing that has happened to me in the last few weeks! An eggless creme caramel! Just as silky, just as creamy albeit slightly firm and jelly-like but almost as good as the 'real' one and quite delicious considering that it is entirely eggless. For those of you who already know of an eggless creme caramel and are not overly stimulated by it that's ok because this is for me and for those who really get galvanized over anything that doesn't use eggs at all but tastes pretty much like the eggfull version especially when it spells dessert, cakes ice cream etc etc etc. Come my comrades let us gather and swoon over this.
I have to thank Mat Gebu/Fluffy Mat for this. He posted this on his lovely blog although quite non-chalantly I must say (obviously the egglessness of it did not raise the slightest quiver in his eyebrows) but I have made it with some adjustments to his recipe just so to get it the way I wanted it.
My children loved it, hub agreed to it after telling him that it is eggless, and I indulged without the burden of guilt.
The recipe...........
Custard :
1 1/2 - 2 Tbsp powdered gelatin ( I used 2 but I think it could be reduced to 1 1/2 to make it a little less firm)
1250 ml fresh full cream milk
120 gm castor sugar
3 Tbsp custard powder
Caramel :
3/4 - 1 cup sugar
3 Tbsp water
Make caramel first :
Put sugar and water in a small pot and heat on medium flame until it starts to turn a light golden brown. Watch it carefully and don't turn away when you're doing this because once the syrup turns golden it darkens very quickly after that. Do not stir. Once the sugar/caramel turns a light golden brown swivel the pot a little to let the colour even out and then pour directly into your mould or ramekin dishes. I used a ring mould with a capacity of slightly over 4 cups of liquid.
Swivel the mould so that the caramel reaches up the sides a little. Let cool and harden.
Make custard :
Pour the milk into a medium pot and sprinkle the gelatin over it. Let the gelatin soften a little then put in the sugar and custard powder. Stir to mix and bring to a simmer STIRRING ALL THE TIME with a wooden spoon until the mixture thickens and coats the back of the spoon. This can take up to 20 minutes maybe. Be patient.
Pour the custard through a sieve into the mould over the hardened caramel and chill in the refrigerator overnight or until firm. Takes a few hours.
To unmould :
Loosen the sides with a knife carefully. Put a serving plate large enough over the top and then turn the whole thing over so that the mould is bottom up facing you on the platter. Get a hot towel (soaked in hot water and squeezed) and place the towel over the mould's bottom. Shake the mould a little, wiggle it some more if necessary until the creme caramel slips out easily. Make sure you use a slightly indented platter to collect the golden caramel that will pool around the custard. Serve chilled.
Monday, March 9, 2009
THE WEDDING
Marriages are made in heaven and on earth where the sun blazes relentlessly, where plans may go awry, where we never arrive on time, where buses breakdown, where perspiration is a matter of fact, where leaves wilt and wither and where, oddly enough, the modest hotel in Segamat in which we stayed was Greek inspired in name - 'The Neo Pegasus'.
Pegasus, the legendary winged horse from a Greek myth, was borne from the blood of Medusa. When Pegasus was stung by a gadfly sent by Zeus, the king of heaven and earth, he flew to Olympus, the home of the gods. Zeus received him and used him for a while to carry his thunder and lightning and later placed his figure in the night sky amoung the constellations. This hotel and the Greek fable behind its name made Segamat, Labis and this wedding oddly memorable.
The wedding was held in the little town of Labis, 40 kilometers from Segamat a small town along the the northern border of Johor. The oldest child and son of my husband's younger brother and his wife, Nasrun and Kartini, Fir was to end his bachelorhood in Labis and begin married life with his then wife-to-be Liza.
So let's have some fun.
The evening of the 7th, a Saturday, the vows and solemnization of the marraige took place at the bride's home in Labis...Liza had on a beautiful lace bordered head dress and a long trailing dress in white. She was one of the loveliest brides I've seen in a long time.
Fir takes his vows, signs and seals it with the Imam, witnessed by parents, uncles, aunts, family and friends. Finally, bachelorhood is history.
Liza waits, nestled between her parents. I caught Fir stealing a glance at her. Looking pleased. As pleased as only a man could be.
The bride returns the promises and vows that Fir has made to her with the promise of being a good and faithful wife to him and in Malay fashion with a kiss to her husband's hand...
The couple exchange rings whilst suffering some good humoured teasing from the oldies who surrounded them. :)
Fir hands the 'bouquet' of 'mas kahwin' / marraige money to Liza, all of RM 22.50, thus completing the officialization of the marraige vows.
I believe by this time the bride and groom have taken some deep breaths, thanked God and can't wait for the next ceremony to be over and done with because Fir still cannot stay with his bride until the 'bersanding' ceremony is over. That does not take place until 1 o'clock the following day. Patience they say is golden.
When all was done Liza gets a hug and kiss from her mother..
Sitting together as husband and wife I see the 'look' and I read Fir's mind....."Finally...she's mine!"
The next day...............Sunday, 8th March 2009
Firdaus, looking very heroic and very tall, dark and handsome, leaves Pegasus Hotel and making sure he gets to his bride are his father, and his bestman, my son Nik.
Waiting at the other end is the bride, Liza, looking gorgeous and absolutely beautiful in white.
God was kind and gave us a hot, bright day with open skies and a blazing sun. Shielded by a golden umbrella and treated like a sultan on his big day Fir strides towards his wife.
Liza waits to greet him at the entrance to her home.
On the dias at last doing the 'bersanding'. Looking perfect and I'm sure feeling perfectly happy and blessed as well.
Beautiful Bride.........
Now for the messy part! Cake feeding...
Now it's Fir's turn.
All in all this was what they really felt like doing.....
Apparently that was what the bestman had in mind too....."Peace to all !!"........ and........
...may the bestman be replaced by a ...............
The wedding favours and gifts from the brides family....
Beautiful mugs nestled in beautiful boxes! And fresh roses from the 'hantaran' (offering of gifts) trays......although they wilted some by the time we drove the 3 1/2 hours home..and when I took the pictures.
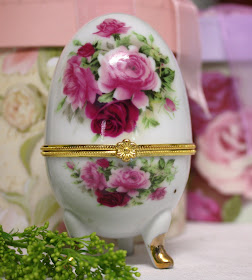
Porcelain 'egg' cases filled with sweets and toffees...
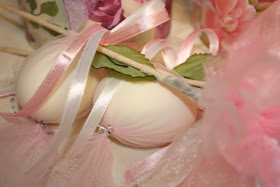
The 'bunga telur'. Stalks of artificial flowers with boiled eggs attached. Probably meant as a symbol of fertility.....it's a wild guess but I don't think I could be far wrong. Each guest gets a stalk.
May Allah bless our dear nephew and his wife and may they have lots and lots of children and live happily ever after! :)