Thursday, April 28, 2011

BRIOCHE ~ PRONOUNCED BRIYOSH


These Brioche made the Top 9 on Foodbuzz today 30th April 2011. Thank you to the Foodbuzz community! Happy Buzzday :)

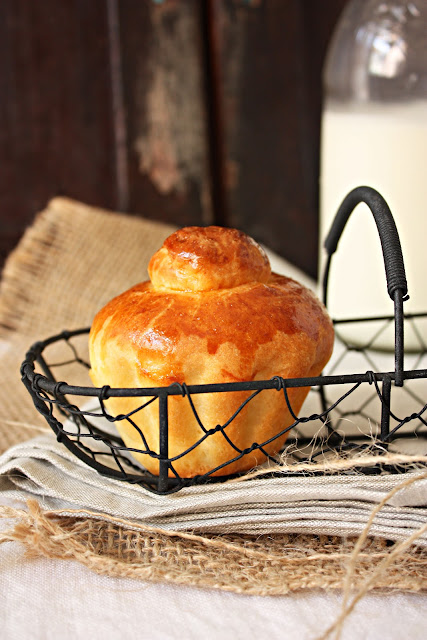
I used Sarah-Jane's brioche moulds from siliconemoulds.com. to make the brioche. They came out adorable with little buns on their heads. I thought it was quite funny when I picked one up and the little bun-head rolled off almost immediately. But it was only the one.  How comic it would have been if all of them had rolled off.

These were the silicone moulds from siliconemoulds.com that Sarah had mailed me. As always nothing could be easier than un-moulding from a  silicone mould.  Effortless. 


A tip I had learnt so that the tops are perfectly middle when they finished baking was to depress the base dough in the middle right to the bottom with your thumb before brushing egg yolk and placing the bun-head on top. Generally, it worked except for a few. But lopsided or not they were delicious, soft, buttery and adorable. What more does one need in a bun.


They photograph well too. But breads always do.


So do milk bottles ~


And then buns. And their bun-heads ~

I wish I had something more to say ~


But I don't. So here's the recipe ~ adapted from Lemons and Anchovies

The brioche dough is usually kept in the refrigerator overnight retarding the dough to develop the flavour and stiffen the rich, buttery and soft dough for easier handling....Wikipedia


  • 2 1/2 cups all-purpose flour
  • Pinch of salt
  • 2 tablespoons sugar
  • 1 package dry yeast (2 1/4 tsp)
  • 3 eggs beaten plus one more, beaten, for glazing
  • 3 tablespoons room temperature milk
  • 1/2 cup unsalted butter, diced


Sift the flour and salt into a large bowl; stir in sugar and yeast. Make a well in the center of the mixture and add the eggs and milk.
 
Beat the eggs and milk together and gradually incorporate the dry ingredients, making a soft dough.  Transfer the dough onto a lightly-floured surface and knead well for about five minutes, until it is smooth and elastic.  I had floured my hands rather than sprinkled flour onto the board when it was sticky.

Add a few pieces of room temperature butter to the dough and continue to knead until the butter is incorporated.  About 2 minutes of kneading for each addition of butter.  Continue this process until you have added all the butter.  I kneaded a few more minutes after the butter has been added until I stopped seeing chunks of butter in the dough.  

I wrapped in plastic wrap anyway and chilled for about 2 hours.

I did not bother greasing the brioche moulds. Take a golf ball size of douh and shape into a ball. Place seam side down into the mould.  Fill up the rest of the moulds similarly and let it rise until double in size. I can't rememebr how many minutes it took. Maybe 30 - 40minutes. Meanwhile shape smaller balls of dough into small rounds for the bun-heads. Keep aside. Press your thumb inot the middle of a risen  risen dough. brush the top with egg yolk and stick a bun-head on the top.  Do the same for the rest.

Cover the balls and allow them to rest for 30 minutes or until doubled in size.  Preheat oven to 400ºF. Before baking brush all buns with beaten eg. Bake until golden and puffed. About 12-15 minutes.

Wednesday, April 20, 2011

EASTER EGG MADELEINES


I don't celebrate Easter but I did have Easter egg moulds given me by Sarah Jane. Thanks Sarah-Jane. So I made some madeleine 'egg' cakes. Each 'egg' deliciously golden.

They had also the humps without the use of baking powder. So I was very pleased. And they popped out of the moulds very easily without sticking at all. These are the lovely moulds Sarah-Jane had given me in 2 different sizes a few months ago. I used the smaller one. Do go to siliconemoulds.com for even more variety of silicone moulds.


I had buttered the moulds using my finger very lightly. The details of the design came out clear marking the cakes very prettily.As you can also see the cakes came out with a lovely sheen. It was beautiful!


I had gotten the recipe from All Recipes but the one thing that I did differently was regards to the butter. I clarified the butter by melting and heating it until the solids drop and begin to brown, I made beurre noisette. It added a lovely nutty flavour to the cakes and gave the cakes a lightly speckled look.


This is a short post. I am feeling very sleepy   ^0^


The recipe ~ From All Recipes....copied and pasted ~


If you wish to do what I did just melt the butter until the solids drop and begin to brown. Turn off heat immediately and strain the clarified butter through a sieve before adding to the mixture.


  • 2 eggs
  • 3/4 teaspoon vanilla extract
  • 1/8 teaspoon salt
  • 1/3 cup white sugar
  • 1/2 cup all-purpose flour
  • 1 tablespoon lemon zest
  • 1/4 cup butter
  • 1/3 cup granulated sugar for decoration

Directions

  1. Preheat oven to 375 degrees F (190 degrees C). Butter and flour 12 (3 inch) madeleine molds; set aside.
  2. Melt butter and let cool to room temperature.
  3. In a small mixing bowl, beat eggs, vanilla and salt at high speed until light.
  4. Beating constantly, gradually add sugar; and continue beating at high speed until mixture is thick and pale and ribbons form in bowl when beaters are lifted, 5 to 10 minutes.
  5. Sift flour into egg mixture 1/3 at a time, gently folding after each addition.
  6. Add lemon zest and pour melted butter around edge of batter. Quickly but gently fold butter into batter. Spoon batter into molds; it will mound slightly above tops.
  7. Bake 14 to 17 minutes, or until cakes are golden and the tops spring back when gently pressed with your fingertip.
  8. Use the tip of the knife to loosen madeleines from pan; invert onto rack. Immediately sprinkle warm cookies with granulated sugar. Madeleines are best eaten the day they're baked. Leftover madeleines are wonderful when dunked into coffee or tea.
  9. Variation: Chocolate Madeleines: Omit lemon zest. Increase sugar to 1/2 cup. Substitute 1/4 cup unsweetened cocoa powder for 2 tablespoons of the flour; sift into batter with flour.


Good night. ^0^

Friday, April 15, 2011

OLIVE OIL CHOCOLATE MOUSSE


I had three choices.

To eat this mousse selfishly with the Brief Wondrous Life of Oscar Wao in one hand, in morning light, in my cotton jammies, to serve it at a playful children's party or to serve it as a dessert after a dinner........ in a more elegant fashion.

But we all know that the party and the elegant dinner was just a figment of my imagination, so yes, I dived into it while in my jammies with Oscar Wao's brief life just within reach.

The morning was blessed to be bright and sparkling. So I did the photo shoot based on the three different settings that were mingling in my head. (just to prove to myself that mousse can be breakfast food is versatile). 


                                   No friends, that isn't a fly. That's an over-roasted chip off a pistachio nut.

Who would have thought chocolate mousse could be made without eggs but with olive oil instead? George Calombaris, one of the judges for Junior Masterchef Australia did. After all he is a sweet Greek.


But I didn't get it from his cookbook. I got it off a page from Delicious magazine in an advert for Bulla Thickened Cream. 

I can't help it. I get attracted to recipes from adverts. And to Bulla thickened cream. And to Delicious. And to mousse.


However, I was worried that the note and slick of olive oil would come strong and odd in a mousse. So I handed it to H rather gingerly. Then, from the mouth of the most cynical eater came these words..."It tastes like ice cream." He finished it. And why wouldn't he? It was chocolaty. It was pretty. And it was healthy.

I'd like to believe in healthy.


                                No friends, it isn't a fly. It's an over-roasted chip off a pistachio nut.

The recipe.................
  
Olive Oil Chocolate Mousse...George Calombaris


Yield...4 servings


100 gm dark chcolate ( I used Tudor Gold 55% cocoa)
50 gm dark chocolate, 70% cocoa (I used the same above)
100 ml evoo
1 cup (250 ml ) thickened cream
1-2 drops lemon juice
1 cup 9140 gm) pistachio kernels, toasted & roughly chopped


Place chocolate in a heatproof bowl over a pan of simmering water (don't let the bowl touch the water) and stir until melted. Stir in the olive oil, then remove from heat and cool for 5 minutes.


Meanwhile, in a chilled bowl whip cream to soft peaks. Gently fold the whipped cream into chocolate mixture until combined. Divide the mousse amoung 4 serving bowls and chill in refrigerator or serve immediately.


Sunday, April 10, 2011

MALAYSIAN SWEET POTATO DOUGHNUTS ~ KUIH KERIA


These actually made it to the Top 9 on Foodbuzz. Scabs and all! Thank you Foodbuzz community :) Happy Buzzday.


I remember sugar scabs being made in a black, heavy, demented looking wok in our wet kitchen. On a gas stove right below a chimney. My god. We actually had chimneys!?!

Anyway, for years I never could figure out how those sweet scabs  materialized. It looked easy and obvious enough but when you expected them to stick to the fried doughnuts when you chucked them in they wouldn't. Not unless you put the doughnuts in at just the right moment. While the crystallized sugar was still damp and bubbly. 

When the bubbly sugar solidified and if too much caked the doughnuts like an armour you could always knock or peel the excess scabs off the doughnuts before serving. 


(This is getting a little too rustic for comfort)


Anyway, I think we, as in Malaysians,  may be the inventors of sugar scabs. I haven't seen it anywhere else except on Malaysian Sweet Potato Doughnuts. I am so glad we did. It gives such an exciting contrast in textures. Crunchy vs chewy.

These are the doughnuts I grew up with.


If you were expert enough like our maid of old you would know to make just enough sugar scabs for the amount of doughnuts you had fried earlier. If you didn't, like me, you could provide a year's ration for the Malaysian Ant Army. Ten times over. 

Recipe..........my version

Yield : 6 medium doughnuts


1 1/2 cups of steamed, completely cooled and mashed sweet potatoes ( I used slightly more than 1 1/2)
About 3/4 cup of plain flour or less
1/2 tsp salt


Mix all above ingredients together. Press together until you get a soft but firm ball of dough. There is no need for any liquid. (I used the red/purple skinned Japanese sweet potato for this. It is less fibrous than the local yellow variety so you don't need to press it through a sieve). You could add less flour if you prefer a less chewy doughnut. If the mixture is sticky flour your hands while shaping if you don't want too chewy a doughnut.


Shape into rings or roll out on a board to about 1/2 inch thick and cut using a doughnut cutter. (This is what I did).


Heat a pan. Add about 1 inch of any vegetable oil and heat the oil till hot. Drop the doughnut dough rings in gently and fry until golden on one side. Turn over and fry till other side is golden as well. Lift out and drain on kitchen paper.

Sugar Scabs.........

You might want to halve this recipe.

1 cup sugar
2 T water


Pour one cup of sugar into a heavy based pan. Add the water. Heat over medium heat and stir until the sugar melts. Keep stirring until the sugar thickens, gets gloppy and shows signs of becoming crystallized. Drop in the doughnuts and mix into the thick sugar paste. Cook a little while more until the sugar crystallizes completely and solidifies and turns completely white. Lift off the doughnuts and and knock off excess sugar scabs. Serve.


Note :

If the sugar crystallizes before it adheres to the doughnuts simply add a few drops of water and stir again.


As much as I dislike posting dull and un-sharp photographs I have to. It's been really grey outside from morn to dusk. For many many days. Especially on days that I decide to make, bake and photograph. Please bear with me. 

I am submitting this to Muhibbah Monday. Find out more here...


Tuesday, April 5, 2011

AVOCADO COCONUT ICE-CREAM


Avocados are one of the creamiest fruits I have ever come across. Its creamier than bananas but has not the sweetness at all. Its green is absolutely gorgeous, its a dream to slice through when ripe and I get a strange pulse of satisfaction from scooping it out of its shell. I have eaten this simply mashed and stirred into yogurt with honey drizzled over the top and I loved it.

When I saw Chef Corbin make this on Restaurant Makeover I thought I had discovered my ultimate creamy health food in my favourite colour. It was easily made in a blender with coconut milk, some cream and some sugar or honey. Blend. Freeze. Scoop. I watched and heard the mm-hmms. Then I made some.

If you're draped in a very gloomy day like I am today and are/am/is me please don't eat this. I felt a tad gloomier after eating this. 

It didn't do it for me. And I have no idea what to place my finger on. 

Avocado? Coconut milk? Cream? 

Or all of the above? I suppose. Because I love all of them but I did not love them all together. I felt like I had on my favourite green shoes with my favourite blue dress with my favourite pink lipstick. All together on me. Imagine that. 

Photographs are poor. The heart was not in it as much as the sun wasn't out.


Recipe................

1 avocado, scooped out from shell, seed removed
a splash of coconut milk
a splash of cream
Squeeezes of honey

Blend. Or process. Omit freeze and scoop.  Smear it on your face instead. Leave on for 15 minutes. Wash off. Pretty face.

Mashed avocado makes a good moisture mask especially when combined with honey. You have no idea what foods I use on my face.


LinkWithin

Related Posts with Thumbnails