Saturday, November 29, 2008

CHOCOLATE CHIP COOKIE STICKS


These are perfect for dunking in ice cold milk or hot coffee/teh tarik/kopi tarik.They are very crispy and crunchy and easy to make although I had a problem keeping 3 pairs of hungry eyes off them so that I could slice and re-bake them as sticks. Not much different from a biscotti except that they are shaped perfectly for dunking.


This recipe is from a magazine called The Better Cook.

1/2 cup shortening
1/2 cup butter, softened
1 cup packed brown sugar
1/2 cup granulated sugar
1/2 tsp baking soda
2 eggs
2 tsp vanilla essence
2 1/2 cups plain flour
2 cups unsweetened or semi sweet chocolate chips
1 cup chopped nuts (I used walnuts) optional

Preheat oven to 180 C.

In a large bowl beat butter and shortening for 30 seconds. Add brown sugar, granulated sugar and soda. Beat until combined. Beat in eggs and vanilla well. Beat in as much flour as you can and fold in the rest. Fold in the choc chips in and the nuts too if used.

Press dough evenly into a 13x9x2 inch baking pan and bake for 25 minutes or thereabouts until the centre is set.

Cool in pan for 1 hour. I did not wait that long because I was just simply impatient so I cut them while still slightly warm and it was OK.

Cut them 1/2 inch wide and about 6 inches long or half of the breadth of the pan that was used. Place them cut side down on an ungreased baking pan and bake them for about 8 to 10 minutes or until they look crispy around the edges.

Serve with a glass of cold cold milk or hot coffee.


Friday, November 28, 2008

SARDINE AND SWEET PEPPER FRIED RICE


It is very difficult to get sardines in oil in KL. Apparently Malaysians prefer their sardines in tomato sauce. So with the disappearance of the Waitrose brand of sardines in oil from the Cold Storage supermarket some time ago I had a hard time looking for another brand of sardines in oil. It was only on a visit to The Village Grocer's at Bangsar Village recently that I finally came across a can of sardines. In oil. It cost ringgit 7.90 which I think is expensive especially for a small can of sardines. The Waitrose brand cost only about four ringgit and is much tastier than this one.

However, with that in hand I was able to at last fry a plate of rice with sardines and sweet pepper. A dish I stirred up one day a long time ago when I was very hungry and nothing else convenient was available in the kitchen cupboard. It turned out quite delicious and tasty and I have been cooking it intermittently since.

I don't really like sweet peppers with their skins on so I peeled a sweet red pepper with a potato peeler and then cut it into strips. It tasted really sweet upon having been sauted and I did not get the taste of the skin which I really don't like.

2 small bowls of freshly cooked or overnight rice
1 can of sardines in oil
1 sweet red pepper, peeled and cut into strips
A handful of sliced cabbage or any veggie that you like
2 cloves of garlic pounded or chopped finely
1/2 tsp of dark sweet soy sauce
A few dashes of fish sauce
salt
black pepper
1 teaspn of chillie paste, or more if you like

Saute the garlic in about a tablespoon of oil. Add the chillie paste if used (which I always use) When garlic has softened throw in the sweet red pepper that have been skinned and cut into strips and the sliced cabbage. Stir fry until the veggies have softened a little. Add in the rice, soy sauce,a few dashes of fish sauce, a sprinkle of salt and pepper. Add the drained can of sardines. Stir and toss well and adjust salt and pepper to taste. Serve.

Serves 2

TIP : My mother in law used to seperate clumped up refrigerated overnight rice with wet fingers before frying. Saves a lot of elbow grease while frying and prevents clumps of white rice in the final dish.

This was the can of sardines that I used. I much prefer sardines with bones as they somehow taste better and the pieces of fish did not disappear into the rice so easily as did this one.


Thursday, November 27, 2008

UPSIDE DOWN APPLE TART


This is an apple tart/pie that I have been wanting to try. I love apple pies but don't relish going through all the effort of making them especially when it requires crusts both above and below and even more so if it has a lattice top. Of course there is no one stopping me from making an ugly pie but I wouldn't waste my time on that either.

So at long last, finally, in the end, ultimately and eventually I dragged myself to the bag of bright green Granny Smith's in the fridge and did I NOT enjoy peeling them. Another reason I don't really fancy making apple pie. But I did it and I was absolutely happy with the results.

So happy was I and my two boys at home that they were hovering around like flies when it came out of the oven. I had to click away at the pie with my camera before it got dragged out of the frame. That was how good it looked, how dizzyingly good it smelled and with a taste to match.

The pastry bottom was absolutely perfect in my book. It was a cross betweena short crust and a short bread. Just-nice sweet, crumbly, tender and buttery. PERFECT.

The topping was caramel like, dark and glossy and had that golden sweet flavour of caramelized apples. The original recipe called for Golden Delicious and warned that it would be dripping with caramel when it came out of the oven. Well mine was not dripping with caramel probably because the apples I used were not Golden Delicious.

And perhaps, also, because I used a bamboo steamer cover while the apples cooked on the stove so there was absorption rather than condensation taking place as they cooked; leaving no excess liquid in the apple filling.

The thought of having caramel dripping all over sounds heavenly but even without the dripping it was PERFECT as only heaven could be. All right I may be exaggerating but it was very very very good.

I tweaked the recipe for the pastry a little as I did not want to use icing sugar so I used castor sugar instead to provide a little crunch. And instead of lemon rind I used the rind of an orange which smelt so good when I was making it but in the end the flavour from the orange rind was overwhelmed by the yummy apple filling upon baking and I suppose it didn't really matter whether there was orange or lemon rind in it after all.

This apple tart would have been absolutely scrumptious with ice cream but there wasn't any and no one could wait the trip to the supermarket so we gobbled it down as it was. PERFECT.

For this recipe you would need a heavy skillet. I used a cast iron skillet/pan that I had bought years ago, meant obviously for something else but it worked well with the apple tart nevertheless, that measures about 10 inches in diameter and about an inch high. The original recipe called for a height of 2 inches. I didn't have that so I halved the apple filling recipe and carried on from there. In spite of that, the proportion of apple to pastry was PERFECT. For me anymore apple filling than that would have been too much although some people would perhaps like more apple than crust. In this tart it was half and half.

I know, I know....before I bore you to death................here is the recipe......

PASTRY..

1 1/2 cups all purpose flour
1/2 cup castor sugar
pinch of salt
1/2 cup cold butter, cubed small
2 large egg yolks
a little cold water if necessary
zest of 1 orange

Stir together flour, sugar and salt. Cut butter into the flour and crumble it until mixture is like fine breadcrumbs. Add a little cold water, maybe a teaspoon at first and bring the pastry together with your fingers. Do not handle with your whole hand especially in warm/hot weather like ours. Once the pastry comes together nicely in a lump and is not crumbly let it sit in the fridge for about fifteen or twenty minutes to firm up a little.

In that case do the filling first because the filling takes about an hour to cook.

TIP : This pastry is very delicate and you may find difficulty lifting it up to drape over the apple filling. So one way is to make sure the skillet of apple filling is right next to where you roll out the pastry. That will make it much much easier. But even if it breaks it is no big problem. Just pat it back into place over the filling.

TIP : Flour the board or table well before you roll out the pastry. Because it is quite a rich pastry the tendency to stick to the surface is greater.


FILLING.....

1/3 cup icing sugar
2 lbs of apples (I used Granny Smiths) peeled, cored, sliced into eigths,
6 Tabspn butter, melted
ground cinnamon

In a heavy 10 inch oven proof skillet with straight sides like in the picture, sprinkle the bottom with 6 tablespoons of the icing sugar.


Arrange a layer of apples in tight concentric circles (I suppose I didn't make it tight enough) over the sugar. Brush the apples with melted butter and dust with cinnamon as much or as little as you like. Repeat the layers until all the apples are used up.


This is the final stage in the layering of the apples, sugar and cinnamon.


Cover with lid or with a buttered foil or a bamboo steamer cover and simmer over low to medium low heat for one hour until the apples are soft and the sugar caramelized. Be careful not to burn them. :D Unfortunately I burnt the centre of the apple filling as you can see in the last pic as I was careless with the flame BUT it did no great harm.

When the apple filling is done roll out the pastry to a circle big enough to fit the top of the skillet. Lift the pastry carefully. I did it the cheffy way by draping it over the rolling pin and carrying it over to the skillet with the rolling pin in hand :D

Cover the filling with the pastry and tuck in any stray edges. Bake in 180 C oven for 20 to 25 minutes. Because my apples were a little burnt in the middle and I did not want to burn it anymore in the oven I placed thick wads of newspaper on the baking tray before placing the skillet on it. It provides some insulation from the heat and I hoped that the apple filing would be safe and not burnt any further. I succeeded.

This is the cooked pie filling and ready for the pastry to be draped over the top. See the thick wads of newspaper underneath?


When the pastry top is nice and golden take it out of the oven.


Invert the tart carefully onto a dish with fairly deep sides if you used Golden Delicious but not necessary if you used Granny Smiths like I did. I'm not very sure whether the different apples used were the cause of less liquid in my apple filling though. I'm just guessing but it is a calculated guess.

Slice and enjoy with a pouring custard or better still with a smooth, silky scoop of vanilla ice cream!


TIP : If you would like a thicker pie use a smaller sized oven proof skillet.

TIP : Place the plate or dish over the skillet before inverting. I did it about 5 minutes out of the oven so do be careful. It's hot! And the skillet is heavy!

Wednesday, November 26, 2008

BANANA OATMEAL AND COCONUT CREAM


I was browsing a health freak food blog and I was struck down by guilt. I began thinking of all the unhealthy foods that I have been eating lately and wished that I had never looked at that blog. Anyway, just to ward off the guilt that was creeping and crawling all over me I cooked myself some oatmeal (even though it was 11 pm). I added a few extra ingredients that were healthy and with a little twist I was pleasantly surprised at how delicious an oatmeal porridge can be. This is what I did and it is diary free.

A few tablespoonfuls of rolled oats for one serving
A mashed banana
A sprinkle of sesame seeds
Honey
a pinch of salt
coconut cream

Cook the rolled oats as you would with some water. When it's halfway done add the mashed banana, honey and salt. When done pour the oatmeal into a serving dish.

Pour some coconut cream over. Just a little. A sprinkle of sesame seeds on top and it was good! I could eat this every morning!

Tuesday, November 25, 2008

SHOPPING AND LOOKING

I made a visit to Bangsar Village yesterday because I knew that with Christmas around the corner I'd be able to get glimpses of some very pretty things at the foyer of the complex. And so I did.

I didn't feel very comfortable clicking freely away with my point and shoot so each time before I did I asked for permission and believe it or not some of them did not allow me to take pictures of the stuff they were selling!! Flabbergasting don't you think?

However here are some of the things that I did get pictures of.

Lace, duvet covers, embroidery, table cloths, cushion covers from China and Vietnam. Those from Vietnam are a little cheaper and are hand sewn and very very pretty. I swooned but did not buy any. Shopping for lace wasn't on my list. If it's on yours be ready to spend not less than a few hundred before coming home happy and contented.


Aren't they beautiful? Tea cosies with the typical green and red of Christmas colours. I do wonder how many people use tea cosies these days? I love them but don't use them although I do remember that my mother used to use them about a century ago :). But beautiful nonetheless and it really wouldn't hurt to use them more often again. But then how many people sit down with the family to have tea at four o'clock these days what with traffic jams and the fact that no husbands or children would be home at that ungodly hour! And needless to say the ubiquitous enclaves of kopitiams and mamak shops are constantly beckoning us with ready made treats in their chatty, yet torpid atmosphere typical of a sunny, humid and tropical country.


This little piece was something I bought and have had for years. I was more intrigued by its purpose when I had bought it and I knew that I would never ever use it. Believe it or not it is a sandwich cover!


Yes it is. What you would do was to make a few, and I really mean FEW sandwiches and put them in the middle and the wrap them up like so in the following picture. And there you have a pretty display of a sandwich cover with the sandwiches inside. A novel idea really and it will certainly keep the sandwiches moist. But unfortunately I was thinking of stains and how it would only serve at most two people although very prettily. I have never used it because I can't imagine my husband and I sitting down to a 'feast' of three of four dainty sandwiches as opposed to two plates of rice. And the STAINS! So what I have done with it now is to throw it over one of my lampshades. It works and I'm a happy woman.


I walked into The House of Presentation and these were what caught my eye. I asked for permission to take some pictures for my blog and the lady in charge seemed hesitant at first and asked if I was going to sell them! Actually I would rather buy them. But I didn't of course because a set of those four pretty plates in a very pretty box would make me poorer by 148 ringgit. Besides I have enough collection of plates that I have yet to hang up on a wall somewhere in my house. But that did not stop me from thinking about buying them though.


Right next to those pretty plates were a box of matching cups and saucers. What else! These pretty things costs 208 ringgit. I suppose they weren't that expensive because I have seen some plates and cups and saucers that could blow your credit cards away for good (Somehow Ikea seems tempting now). So I must say that they were reasonably priced. They were not too much on the higher end and quite affordable to many I suppose.


I turned around and these were what I saw! So pretty and dainty were the tiered plates that I fingered them. I believe they cost around a hundred ringgit or more. Didn't buy them though.


Who wouldn't want a set of pots and pans like these? Tell me. Nope, didn't bother to check out the prices.


Back out into the foyer I saw these very Christmassy plates that costs 20 ringgit each. Love the colours and great for gifts.


Some more christmassy salt and pepper shakers. Would have bought them if the attendent did not chase me away for taking pictures! He probably saved me about 50 ringgit. Or was it 80 ringgit? Thank you very much.


Some more Christmassy stuff. Candle holders and flower pots? I just love the red. I just thought the shapes of the flower pots were very pretty. I realise now that I like anything scalloped.


Dropped in at the Khazanah stall. And I saw these lovely lamps. Very Alladin-like but to consider buying them did not cross my mind so unfortunately I did not check out the price. But they are beautiful aren't they?


Turquoise is soo middle eastern and I just love the colour of these thingys. I suppose they are candle holders or something of that sort. Dust magnets. That was what came to mind but I took a picture anyway because they were very attractive.


Necklaces. Beautiful and exotic. Wouldn't wear them myself because it would just take too much work and effort to mix and match. But lovely aren't they?


THEN I went to do what I always do. Grocery shopping. I dropped in at the Village Grocer Supermarket and since I seldom go there to do my not so weekly shopping I was pleasantly surprised.

First of all I stumbled upon a satisfying variety of whipped cream of which some were very reasonably priced. I bought the cheapest at 12.90 I think. It was dairy cream and not a vegetable product. These are what they had and I happily clicked away. So for those of you who are looking for whipping cream (dairy) at reasonable prices this is the place.


This is also the only place that I have seen extracts in these variety. Pure vanilla extracts, peppermint extract, orange and lemon extract and imitation rum. A little pricey of course so if you really want original vanilla essence go buy the vanilla beans at a bakery supply store. Much cheaper and more authentic I believe. But imitation flavours are available here as you can see. Imitation rum. Wonder if they will pass a fatwa on that?


Some more flavours! For lazy bakers.


Then I came across these. This is the ONLY place where I have seen these. I mean I've seen Betty Crocker's chocolate cakes and brownies etc but not pie crusts. Not that I need to buy them but it just goes to show that one can get lots of things here where you can't find in other supermarkets even in KL. As far as I know. Pricey aren't they? If you were to make them yourself it would probably cost a third of what you have to pay for here.


Button mushrooms at 28.50 per kilo. Quite reasonable but if you want to get it at a cheaper price go to the Taman Tun Pasar Besar. It will cost you only 20 ringgit per kilo at a certain stall! TTDI Pasar Besar here I come!


Monday, November 24, 2008

BREAD PUDDING


This recipe is specially for my daughter's friend Lyn upon her request. It's is one of the easiest desserts to make and it is very yummy. It can be eaten as it is or with a poured custard. We at home prefer eating it as it is.

4 slices of day old bread
4 eggs
2 1/2 cups full cream milk
3/4 cup castor sugar or according to taste
1 tspn vanilla essence
some butter

Grease an oven proof baking dish of about 1.2 liter capacity.

Slice the bread diagonally so that you get 8 triangles. This is not a rule but rather an option. You can slice it anyway you want or not at all. Butter the slices on one side and then arrange them in the greased dish anyway you like. Make sure that they are spread out though.

Break eggs into a large bowl. Add sugar and beat just until sugar dissolves. Do beat too much as you do not want the mixture to foam up. Pour int he milk and mix well again. Add a pinch of salt if you like and the vanilla essence. Stir.

Pour the egg mixture ontothe bread pieces in the baking dish and press down the bread if necessary to ensure that they are all covered by the milk. Let stand for about fifteen minutes to allow the bread to completely soak into the milk.

Bake at 180 C for about an hour or until the pudding is fairly firm to the touch.

Serve hot or cold with or without pouring custard. We like it cold....

..this reminds me of a nursery rhyme that I used to rattle off as a child...

Pease porridge hot
Pease porridge cold
Pease porridge in the pot
Nine days old
Some like it hot
Some like it cold
Some like in the pot
Nine days old

TIP : Bread pudding wouldn't last nine days


I'VE BEEN TAGGED!


Ganache-Ganache and Terri from A Daily Obsession just tagged me and I'm supposed to reveal seven things about myself. Well here goes ........

I enjoy a good laugh because I think a person can't ever be complete without a good sense of humour.

I often wonder which is better. Reveling in the freedom of being unknown or suffering the confinement and scrutiny for the sake of 'famousity'.

I have reached a stage where I can walk into a household department, clothing store and a shoe shop and not buy anything.

I am a fast walker. So fast that my children can't keep up with me. I think each of my five children are beautiful, wonderful and special.

Inspite of having a food blog I'm still asking myself "What shall I cook today?". Everyday.

I have a deep and high regard for those who have willingly chosen nursing as a career knowing full well what they are in for and for their desire to care and to nurse. They are a different breed of human beings altogether and they deserve much admiration and a deep respect.

I reward myself at every excuse with a bar of chocolate. Love chocolates and ice cream.

I don't know very many food bloggers too well yet but what better way to get to know them I suppose. So most of whom I'm tagging here will be surprised.... but nicely surprised I hope!

Juli of Joyluck Kitchen
ICOOK4FUN of Kitchen Snippets
Chef E of Behind the Wheel Chef
Nate-n-Annie of House of Annie
Lydia of Mykitch3n
Julietilsner of Bad Homecooking
Audrey of Audrey Cooks

Rules! Always the rules...

Link my blog (tagger) on your blog.
Give seven facts about yourself.
Tag another seven bloggers by leaving a comment on their blogs and letting them know that they have been tagged.
List them on your blog.

Thursday, November 20, 2008

STEAMED COCONUT LAYER CAKE


Ahhh.....I have been drooling over this recipe for years. Been looking at the pictures in the Taiwanese recipe book that I stumbled upon some years ago while in Taiwan and I have been pushing myself to Just Do It. Finally.... I did do it.

I suppose the only reason that I never brought myself to try out the recipe was because I knew that I could not get the perfect shredded coconut.

I believe for any sweet dessert that requires shredded coconut as an ingredient it is crucial that the shredded coconut kernel is coarse as in sweet, long, flaky and juicy strands that spell crunch and oozes a juicy sugary sweetness at very bite. That is my idea of a coconut filled dessert. I have no desire to work up the energy to bite into a sweet coconut filling that feels like a boring and flat sugary paste without interest, texture or life.

Then one day when I was at a bakery supply store which is constantly run by a staff of employees who practically scream "take it or leave it" into your face I stumbled upon a large packet of flaky coconut strands. With my hands wrapped tightly around the large dense packet I looked up into the heavens and thought that perhaps it was meant to be.

Coconut layer cakes here I come. I was ecstatic.

I thought it strange though that it was labeled Hawaiin Coconut Flakes. I sniggered and for a moment wondered quite naively why on earth did we have to import coconut all the way from Hawaii when the availability of nuts in Malaysia abound beyond needs and dimensions. Then I figured it out. We needed the word Hawaiin to make it mysterious and exotic and EXPENSIVE. Ten ringgit for a 500 gm packet of grated coconut! While thanking heaven though I meekly paid the amount to the horrible cashier and left.

The recipe called for candied papaya shreds too as a topping.

I forgo-ed that and used chopped glaced cherries instead. It was a mistake because the red of the cherries smeared the top and made the cake look quite messed up leaving stains of red where the pieces of cherries had fallen off. But the 'Hawaiin' Coconut Flakes more than made up for it and it was indeed heaven that I bit into.

Imagine squelching into a soft-puffy-pillow of steamed white bread layered with juicy-buttered-candied coconut flakes in your mouth.

Imagine.


The Dough :

6 cups flour
1/4 cup sugar
13/4 warm water
1 Tbsp yeast
1 Tbsp baking powder
2 Tbsp shortening

In a bowl dissslove the sugar in warm water and then add the yeast. Let it stand until the yeast froths. I used instant yeast granules but followed the instructions anyway.

Sift flour into a bowl. Add the shortening and rub it in until it becomes the texture of fine braedcrumbs. Add the frothed yeast mixture and bring the dough together and knead with the heels of your hand.

If dry add water by wetting your hands or if too wet add flour. Knead until smooth and elastic. Place the dough into a large greased bowl and allow to rise unti it has trippled in bulk.

You can knead it again for 5 minutes and let it rise again or you can use it straight away. I let it rise a second time because Iwas watching something on tv.

Filling :

11/2 cups shredded coconut
1 cup icing sugar
1/4 melted butter

I actually ended up doubling the filling recipe because I ran out of filling for the second batch or thought that it wasn't enough to make it really yummy and moist.

Melt the butter in a pan. Stir in the coconut flakes and icing sugar. YUM! Oh ..divide the filling into 8 portions.

Construction :

Divide the dough into two. Roll out each half to a rectangle 16" by 6". I thought that 6 inches was a little narrow so I rolled it out a little broader. I suppose what should be the guide line is the thickness of the dough. The dough should be rolled out reasonably thin so that you do not get thick layers of bread and thin layers of coconut filling. The first batch I made was a little thick on the bread so I thinned out the second batch a little more.

Once you have a rectangle, mentally divide the rectangular dough into three parts and spread one portion of the filling on teh centre of the dough. Fold the left side over the midle portion and spread the filling. Fole the right side over.

Turn the folded dough to a horinzontal position and repeat teh rolling and folding process one more time. Then roll out the strip to an 8 inch square shape. Make the other half in the same manner. You can top it with the candied papaya/paw paw or with just some plain shredded coconut . I prefer the latter.

Prepare a bamboo steamer that has two tiers. On each tier lay a clean damp dish cloth and place the prepared square dough on each. It is obvious that one square will be ready before the next so you should place the first square first and let it rise for exactly 30 minutes. About ten minutes before the thirty minutes is up bring the water in the steamer pot to a rolling boil. Steam the bread for thirty minutes. Do not open the lid in between or the bread will fall.

Do the same for both halves. Remove the damp cloth from under the bread as soon as you can before it sticks to the bottom of the bread. Allow it to cool slightly. Slice and serve.

TIP : Do not let the prepared bread rise for more than 30 minutes or the dough will fall.

TIP :Always steam bread over boiling water, over high heat; otherwise the snack will be doughy.

TIP : When rolling out the dough do not knead it before rolling because it will cause the dough to be too elastic to roll out well or thinly. Just press down very lightly for a second or two and then roll out immediately while the dough is still soft and spongy.

TIP : I personally prefer to use ordinary bread flour even for pau or other pau like bread snack/cakes like this one because I do not like the fineness of a pau that uses those very refined special Hongkong flour to achieve a very very soft air-like pau. It is too fine and it just crumbles in my mouth before I can even begin to have a good chew or wonder what I had just eaten. The rustic quality of a pau that uses ordinary bread flour is much more to my taste and I enjoy biting into it and in this case sinking my teeth into the buttery coconut flakes in between each layer.

Drool......I'm going to make this again very soon.


Friday, November 14, 2008

A MALAY CHICKEN CURRY


I mention Malay curry because there is also the Indian/Mamak (Indian Muslim) curry in Malaysia which does taste slightly different. The Indian curry uses more of certain spices and is oilier with a slight sourness to it, probably due to their use of yoghurt in most of their curries. Its very good and I have no complaints but the Malay curry is what I cook at home. On the whole I think it's lighter in the spices and uses no yoghurt. It's very easy to make and this is what we eat with our rice, rotis and it is what we serve on special occasions as well.

Strangely for some reason that I have never been able to understand we do not use curry leaves for the Malay chicken curry or any meat curry for that matter. The only time we use curry leaves for a curry is when we cook a fish curry. Indian curries are are more liberal in their use of curry leaves, whole mustard and fenugreek seeds and a range of other spices in all their of curries. As a result the Indian curry has more aroma coming from the spices while the Malay curry has a sweetness to it as a result of the coconut milk (original Indian curries do not use coconut milk).

The Malay curry is, as a result, simpler and straightforward, is slightly sweeter than the Indian curry and the curry on the whole is not overwhelmed by the spices and it tastes very good as well in its own less complicated and less spice boggling way.

The recipe :

6 whole chicken legs, chopped into bite sized pieces

2 large or 3 medium large red onions
2 cloves garlic
1/2 inch ginger

2-3 heaped tablespoons meat curry paste (I used Baba's)
Some water to mix with the curry paste

1 small stick cinnamon
1 star anise
2 cloves

220 ml thick coconut milk
1/2 cup water

4 tablespoons cooking oil
Salt to taste

Grind or process the onions, garlic and ginger to a paste. Add water to the curry powder until it has the consistency of thick cream.

Heat up the oil in a pot. Saute the onion paste. Throw in the cinnamon stick, star anise and cloves. Saute the onion paste until translucent, then add curry powder paste. Stir to mix and then continue to saute until the curry powder turns a darker shade and the oil rises to the top.

Pour in the coconut milk and bring to the boil. Put in the chopped chicken pieces and stir. Bring to the boil again and then lower flame to a simmer. Add salt. Cover and allow the chicken to cook through. Add the 1/2 cup of water and bring to a boil and then simmer for another 5 minutes or so. Done.

You can add some potato chunks 3/4 of the way through the cooking but I did not because I was too busy flipping the naan and forgot.

Thursday, November 13, 2008

HOME MADE NAAN -HENRY K'S


I'm so glad I signed up for foodbuzz because I found this wonderful recipe on Henry K's Flavour's blog through foodbuzz. He called it Excellent Home Made Naan and with a title like that how could anyone resist trying the recipe. Also I noticed that there were five stars next to the recipe so I never gave it a second thought and decided to make it.

Like I always do, I skimmed through the recipe, picking up only the important parts, scrawled the recipe (ingredients only) ona scrap of paper and tried to remember the rest in my head. Computing has a way of making you detest handwriting.

The original recipe called for unbleached flour and 1 tablespoon of wholewheat flour. I used plain white bread flour and instead of peanut oil I used olive oil.

3 cups plain bread flour plus 1 tablespoon
1 tsp instant yeast
1/2 cup water
1/2 cup milk
1 tsp olive oil
1 tsp salt
1/2 tsp sugar

In a small bowl add water, oil, sugar and yeast. Stir. Keep aside and let it froth. I always thought this step was not necessary when using instant yeast but I wanted to follow instructions so I did it anyway.

Put flour in a large bowl and put in the frothed yeast mixture and 1/2 cup of milk. Mix first with a wooden spoon and then with your hands knead until smooth. Maybe 5 to 10 minutes. Add flour bit by bit if sticky. When smooth let it rest for 10 minutes on the board. I have no idea why but that was what Henry K said to do. Then put into a greased bowl and leave it to rise till double the size with a damp cloth over the bowl.

When the dough had risen I put it back on the board and pressed it GENTLY with my knuckles, careful not to push it forward, as per Henry K's instructions, as you would normally do when kneading other kinds of bread. When I pressed it down into a rough rectangle, I then, according to Henry K's instruction, folded one end over midway and then the other end over it. I pressed the dough down again GENTLY into a rough rectangle and did the same folding over again. Then I was not sure whether I should make it into a long roll or what.

In the end I did not do anything like that but instead just divided the dough into 8 equal parts and then formed them into balls by gathering up the edges and pinching it underneath until they formed a ball shape. Henry K gave strict instructions not to roll the dough between your palms like modelling clay. The feel of the dough should all the time be soft and spongy.

Cover the rolls with a damp cloth (I did not use cling wrap) and let them rise a little....about 5 - 10 minutes.

At this point heat up the oven to 200 C. Place an ungreased baking tray to heat up in the oven at the same time. Henry K suggested a pizza stone! If anyone out there (In Malaysia) has a pizza stone I'd like not to know.

Then take one roll and with your thumbs and four fingers press it into a flat circle and continue doing so until the circle gets bigger and then start flipping it from one hand to another until it develops into a naan shape, oval, that is. Somehow the circle never got bigger so I had to pull it bit by bit to make it get bigger. Watch the video on the link to Henry K's blog that I am going to give you at the end of this post (after you have finished with mine).

Do this for all the other rolls of dough and when all are ready then cover with a damp cloth/tea towel, let them rest for about 5 minutes and then just before putting them into the oven on the heated baking tray give the naan a few more flips. I put in 3 naans at a time.I used a pretty large tray. I did not use the broiler though because I did not remember reading that Henry K said to use the broiler. I could not go looking at his blog while I was so busy focussing on flipping the darn naan.

I baked them in the oven until it turned lightly brown and they bloated up. The puffiness subsided after a while out of the oven (thank god) otherwise it would have looked quite unbecoming. It didn't take long at all actually...I did not time the baking it but I would say about 5 minutes.

My naans looked nothing like Henry K's. They were no dark brown spots and they were thicker because I could not keep checking his blog to see what they looked like exactly. So depending on my memory, If you can call it one, I thought the naans were supposed to look like how I made them. Nice, thick and fluffy looking.

Also I did not look at his video on flipping the naans until I had finished eating my naans because my computer is so S-L-O-W. So you should look at the video first if you have to urge to make the naans. Henry K's were thinner and I am sure that that was how they were supposed to look. But it tasted really good anyhow and I liked the puffiness. They went well with the chicken curry. Yum.

The link is here.

TIPS : All on Henry K's post.


Tuesday, November 11, 2008

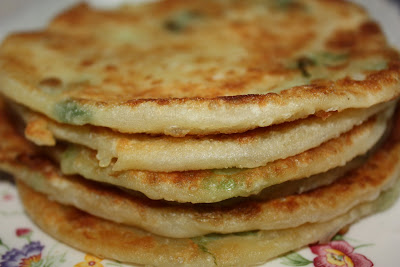
CHINESE ONION PANCAKES


When we lived in Taiwan for three years I loved watching the chefs of a certain eatery make these Chinese pancakes through the glass window of the shop. The pancakes looked so good and crispy when just off the hot pan that I practically stood there and drooled. And the chefs were so deft at making them that I could have stood there all day just watching them roll out, fry and flip them over one after another almost deliriously for the long queue of waiting customers outside. Like all skilled cooking demos I found the pancake making quite mesmerizing. Not that they were all that difficult to do but, heck, I just love watching skilled chefs at work.

Apparently it was a favourite snack amoung the locals and I was so delighted that I came across a recipe book in ENGLISH that had a recipe for that exact Chinese pancake.

The pancake looks very much like a mamak roti canai although not as flaky but delicious just the same. These pancakes can be eaten with anything you fancy. A curry in my case or as the Taiwanese would eat it , with Moo Shu Pork, (stir fried pork and eggs).

Like the roti canai, eggs can be added to these Chinese pancakes when stir frying them. It's the Chinese version of a Malaysian 'roti telur' or 'egg roti' I suppose. I've never tried cooking the pancakes with eggs as we are a little health conscious but I am very certain it tastes even better that way.

Because of the way the pancake is rolled up and then rolled out the pancake does fluff up a little
when fried thus giving it it's crispiness while hot. And the onions give it sweet flavour. The original recipe calls for lard instead of olive oil to be brushed on before rolling it up.

Recipe for the Chinese pancakes/crepe :

1 1/4 cups plain flour
3/8 cup boiling water
1/2 egg or 1/8 cup cold water

1 Tbsp chopped green onions
1/2 Tbsp shortening or olive oil
1/2 tsp salt

Dough : In a bowl add boiling water to flour and mix. Add egg or cold water. Mix again until smooth. Set aside for 20 minutes. Cover the bowl with a damp cloth. After resting remove the dough and knead it on a lightly oiled surface until smooth and elastic. Roll the dough to form a long roll and cut into 6 pieces.

Take one of the 6 pieces of pancake dough and roll out into a cirlcle about 4 inches in diameter. Brush dough lightly with shortening or olive oil. Sprinkle salt and then some green onions over the dough.


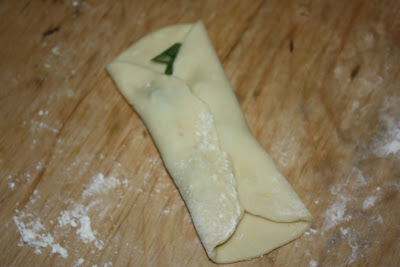
Now fold one side over up to the middle of the circle and then fold over the other side as in the picture.


Then taking the dough from one end roll it up like a swiss roll. Then turn it over on its side like in the picture below.


Press the dough down and roll it out into a circle ready to be fried in a pan.


Do the same to the other 5 rolls of pancake dough. And its best not to overlap them up the way I did though especially if you're making quite a number. Keep them seperate otherwise they'll stick.


Heat up a pan and then pour in about 1to 2 tablespoon of cooking oil. The original recipe called for 4 tablespoons but I found that a little too much. When the oil is hot fry the pancakes until golden brown on one side and then turn over to fry the other side.


Enjoy. YUM!

Monday, November 10, 2008

CORNFLAKE MACAROONS


This is a very very simple recipe that is basically a meringue. Is a meringue. Quick to make, looks pretty, nice and chewy inside and crusty on the outside with cornflakes to add texture and crunch. Like all things sweet it is a good accompaniment to a bitter cup of coffee.

2 egg whites
1 cup sugar
1 cup cornflakes
1 tsp vanilla essence

Beat egg whites with the whisk attachment until stiff then add sugar gradually until soft peaks form. Add vanilla essence and beat a while more. Do not over beat otherwise the meringue will 'fall'.

Fold in cornflakes with a spatula.

Put little mounds on a baking tray lined with non-stick baking paper and bake at 170 C for 20 -25 minutes.

LinkWithin

Related Posts with Thumbnails