First of all I wish all my friends from blog land and the real world and my dear blog visitors who celebrate Christmas a Merry Christmas.
This cake was made for N's birthday today and as always most times I end up making a chocolate cake. This is a steamed chocolate cake that I got from San's Blessed Moments.
Chocolate has always been a favourite in this house with everyone and also because ~
" Every time I hear that dirty word exercise I wash my mouth out with chocolate." Unknown
This was a moist and chocolatey cake with the perfect amount of sweetness ...meaning not too sweet at all. I covered it with fresh whipped cream because ...
I had taken out the butter from the fridge, looked at it then put it back in.
Since we had only cut the cake this evening I could not take a photo of a sliced piece. I hope to take a picture tomorrow. Do take note of the word "hope" though.
The recipe...
200 gm sugar
200 ml evaporated milk
180 gm butter
2 eggs
100 gm plain flour
50 gm cocoa powder
1/2 tsp baking powder
1/2 tsp baking soda
Butter and line an 8 inch pan with greaseproof paper. Prepare the steamer and let the steamer heat and come to a boil while you make the cake.
In a medium pot simmer over low heat the sugar, milk and butter until the butter has melted. Let cool until almost cool then beat in the eggs. I used a whisk.
Sift the flour , cocoa, baking powder and baking soda into a bowl. Pour the butter/milk/egg mixture into the flour mixture and mix well. I used the whisk again to do this. I find that a whisk mixes the dry and wet ingredients faster and better than a wooden spoon would.
Pour mixture into the cake pan and when the steamer water is on a rolling boil place the cake pan into the steamer. Steam for about 45 mins . I divided the mixture into two 8 inch pans and steamed each for 30 minutes.
the cake is done when it feels firm when gently pressed in the centre. Let cool before turning out.
It is quite difficult to over bake a cake that is being steamed. Steamed cakes are moist and does not dry out while being steamed.
I had used a bamboo steamer and the one challenge I often encounter with a bamboo steamer (placed over a wok) is to have the cake pan level and not dipping more to one side. But often the cake comes out thinner on one side and thicker on the other because of the imbalance. I would have used a pan rather than a wok if I had one large enough to accommodate the bamboo steamer.
I have tried very hard to like strawberries because they are such pretty little things but I can't. That's why you will find few recipes with strawberries on this blog. I always find them tart and not at all sweet.
Having said that, they were at the least ..juicy. I bought strawberries with the original intention of making financiers with sliced strawberries on the top like here. I thought they would look very pretty. But that didn't happen. This did. Because I did not want the strawberries to go to rot.
I used the same recipe as Sweet Potato Cinnamon Rolls but added dried cranberries and fresh strawberries instead. Then I placed the dough into cupcake liners and 3 mini loaf liners, scattered flaked almonds and sugar nibs that Sarah from Siliconemoulds had given me sometime ago on the tops. I made buns. They were very moist because of the sweet potatoes and fruity because of the cranberries and strawberries. Strawberries out.... next time.
The recipe is here. Just add a large handful of dried cranberries that have been softened in a little warm water for about 5 minutes then drained and patted dry, some chopped strawberries if you will just after the flour dough has been brought together with the egg and warm water. Knead gently as in the recipe instructions and let rise once before dividing the dough into cupcake or loaf tins. Then sprinkle some flaked almonds and sugar nibs if you have them over the top just before you put them into the oven.
I baked the "muffins" for about 20 minutes depending on the size you make of course and the mini loaves for about 35 minutes. Than I dripped over their tops in zig-zaggy lines some glace icing (I mixed icing sugar with some water to a flowing consistency). However, R did not like that. Alternatively you could brush some honey over the top just after it comes out of the oven.
They actually taste like a cross between bread and very moist muffins. You cold add more sugar for sweetness. These only had a hint of sweetness...mostly coming from the sweet potatoes.
Today is sweet potato day. I've just made some sweet potato cinnamon rolls that are the moistest, softest, cushiony-est, sweet potatoe-iest buns I've ever made. This recipe is one that I concocted. There was a lot of vacillating between cake, buns or onde-onde. But finally ...a decision. And more importantly ....action. And these rolls are here to stay. You just have to make them. Have to make them. Have to make them.
I used Japanese Sweet Potatoes....the purple skinned kind. The smooth inside kind, the yellow inside kind, the non fibrous kind...yes I did. Things may turn out differently if you were to use a different kind ~ I know you know that ~ I'm just saying ~ :)
The large proportion of grated sweet potatoes gave the buns so much flavour, moistness ans richness. I'm so soo pleased. It was a hit at home. You must try.
I must declare too that those sweet potatoes were steamed, drained and sat in my fridge for the longest time. Like a week. Or more? I must also declare that the bread dough sat in my fridge for 2 whole days before being baked. Yes it did.
Some brown sugar to sprinkle ( i didn't measure) Cinnamon powder
Grease a 9 inch tube pan well and keep aside.
Mix flour, yeast sugar, baking powder and salt in a large bowl. Stir to mix. Add butter and rub in the butter into the flour until it becomes crumbly. Add the grated sweet potato and mix it in. Add egg and then the water. I added 125 ml. Mix with a spoon first to gather up the dough and then use your hands to bring the dough together and then turn onto a floured board and knead for about five (5) minutes.
The dough will be very soft and sticky so knead very lightly and don't put too much pressure otherwise the dough will simply stick to your hands. If too sticky ...flour your hands rather than the dough and continue to knead until reasonably smooth. Don't worry if its still soft and little sticky.
Oil a large bowl lightly and place the dough inside and cover with a damp cloth or cling film and allow to rest for 1 hour or more if necessary until the dough doubles in size. I left it in the fridge for 48 hours.
Turn out the dough, once it has risen, onto a very well floured board, press it down to flatten a little with your hands and roll out with a rolling pin into a large rectangle about 15 inches by 10.I didn't measure but I think it was about that size. This is just like making a cinnamon roll.
Using the softened butter spread the butter all over the rectangular dough like spreading butter on bread but leaving 1 cm clean all around the edges. Then sprinkle brown sugar, then cinnamon all over the buttered dough as much or as little as you like but make sure it is evenly spread.
From the 15 inch end start o roll the dough into a swiss roll puling to tighten as you roll so that the roll will not come loose.
Cut the rolled dough into 12 equal pieces. Arrange the slices of cut rolls into the greased tube pan at an angle until it is filled up with all 12 pieces. Let rise, covered with a damp cloth or cling film draped loosely over the pan. Once the dough has risen I sprinkled a little more brown sugar and cinnamon over the top. Bake in a 350 F pre-heated oven for about 20 -25 minutes until golden brown.
Invert and pull the rolls apart and serve.
Note : the sliced raw rolls may be kept overnight in the fridge and baked the next morning. That's what i did.
I'm not much of a drink person. I'm more of an eat person. So spoonfuls of Nestle's Everyday Milk Powder, cod liver oil, Wood's Peppermint Cough Syrup and Milo from the tin/bottle were weird combinations of snacks for my mid-afternoon-after-school indulgences before I resumed frolicking aka wrestling aka as punching matches with my brother or careering down the tarred, bumpy and sandy road on our nailed together four wheeled sled/plank. Those were the muted turquoise, mint and tangerine vintage-coloured years of my childhood.
I want it back.NOW.
Back to the future........comes Milo Dinosaur. I first heard of this concoction when N the man returned home from Singapore and gushed about it several years ago. I gave a glazed smile and the Milo dinosaur slipped into a small fissure of my brain. Then yesterday H and I found ourselves wandering into a food court like lost and aimless souls. I sashayed over to the drinks counter and my eyes fell upon the printed out price of a Milo Dinosaur at RM 5/. I almost shook with laughter and swore I'll make a Milo dinosaur when I got home.
However my vintage mind had no clear idea where to begin so I googled a forum by teenage kids discussing their favourite Milo Dinosaurs and incredible Milo concoctions. They were so cyuute that I spent a good hour reading and giggling like a teenage schoolgirl over the threads of their conversation.
It turned out that a Milo dinosaur is a no-brainer and in my experiment I decided against using any hot water at all. I was right. The Milo dinosaur was lumpy, cold, thick, chocolatey and yummy. I also gave it a twist by adding 1/2 a teaspoon of instant coffee. Oh MY...
However, the sizes of what I made were more like baby Milo dinosaurs.....someone said.
No exact measure really.....do what you like....its the how that makes it what it is ~
A standard mug or a small mason jar was what I used 2 T Milo powder 1/2 tsp sugar 1/2 tsp instant coffee 2 T (about) of very cold fresh milk more very cold fresh milk Crushed ice More Milo powder
Mix ingredients 2 to 5 in the mug with a spoon until it looks muddy and the Milo granules somewhat dissolved. Add more cold milk 2/3 way up and stir. Top with crushed ice. Then top with lots of Milo powder until it looks like an anthill. Serve cold and immediately. Drink/eat with a spoon.
It's hard to picture bau on a plate and Dad on a chair together, face to face. But curry was a different matter altogether. He had to have it everyday. Like water. Especially a fish curry. So if Mom asked (which she would do almost everyday) what she should cook with this or that, accompanied by a plagued and tired look on her face, Dad would simply answer "curry" without flinching, without looking, without thinking. You would think that that would be the end of Mom's problems. But no. That was her problem.
Was that why she left him? We often wondered. Because right after she did she abandoned curry and went for bau. Bau this, bau that, it was bau, bau, bau.
Finally, exasperated, Janna asked her one day after school
"What's with the bau Mom? "
"This is the one thing your father hated. Bau. And I hated all that curry. Everyday. To cook, to eat, to cook, to eat. Why do you think I left him? "
Janna who was strangely unaffected by our parents' divorce until that moment glared at Mom through her dark, almond eyes from behind her thick fringe. Yes, it was a long fringe that she grew so she could stare at a boy at school without looking like she was staring at a boy at school. Then she got up, scraping the kitchen chair backwards against the floor, stomped over and reached for a pau. As soon as she snared it in the palm of her hand she headed for the kitchen door, opened it and stood there for a moment as if debating if that was the right thing to do. Then with a fling of an arm the white, round bun flew like a jet plane and crashed into the Cat's Eye tree about 10 meters away. Leaves rustled, birds flitted, bird wings flapped and Mom opened her mouth to start a cry of astonishment that didn't come. That was when my older sister walked out, lived with Dad and never came back.
Ever since then Mom started making bau with a curry filling. She made it like a machine, emotionless, her fingers deftly pleating white circles of dough over a crimson, spicy filling, her dark eyes blank, her lips a line, almost as if defiance and submission had fought out a duel and neither won. I would watch her and feel my mind wander. Was this what life was all about? Curry or Pau? Either this or that? Or this and that? Or this with that? Often in bed I would shake my head in the void of the night so that those confounding and senseless thoughts would spill out and things would be right. It never did. Then one day, two years later, Mom whispered in a wasted and dying voice,
" If you hate something bad enough it will surely come back and haunt you."
With that she let out her last breath, closed her eyes and died before me. I felt her dry hand go limp in mine. I looked down at the dead tributaries of bumpy veins embossed on the back of her hand. I ran my finger along one of them, slowly. And in that silence, alone with my dead mother I heard my heart thumping and felt my temples being squeezed by God.
I have never, since, hated anything as badly as I hated my mother at that moment, and myself, for not figuring it out. So that she could have saved herself. Because it was not the bau or curry after all. It was hate that consumed her life.
And Janna knew.
Therefore I am now.....balanced.
I love Bau and Curry. Curry with Bau, Bau or Curry, Curry over Bau, Bau over Curry, Curry inside Bau. I love bau. And curry. :)
1 - 2 T curry powder, any, mixed to a slurry with 2 T water
1 T cornstarch mixed to a slurry with a little water
1-2 T cooking oil (I used vegetable oil)
1-2 T oyster sauce
salt to taste
Heat the pan and then add the cooking oil. Throw in the diced onion, garlic and ginger and saute until fragrant or the onion pieces turn translucent.
Add the slurry-ed curry powder and stir and watch carefully so that the paste doesn't burn. Add the oyster sauce. Add the diced chicken, mix well and then add salt to taste. you may add a little water if the mixture seems dry.
Finally pour in the cornstarch slurry and stir quickly so that the sauce won't get lumpy. Taste again and adjust salt.
The final mixture should be a thick curry almost a paste with diced chicken in it. ...like spaghetti sauce or sambal.
To make buns ~
Tear off pieces of risen dough into 50 gm pieces. Roll into a ball and roll out with a small rolling pin on a floured board into a small circle about 3 inches in diameter. Thin the edges by lifting up the circle of dough and pressing the edges with your thumb and first two fingers all around the circumference. Then place the flattened circle of dough onto the palm of your hand.
Then using a teaspoon scoop up some filling and place in into the centre of the dough. Start pleating the edges like in this video. :)
I made a mess . Some of the curry sauce leaked out while I was "pleating" and my 'pleats' were not exactly pleats. But who cares :)
As each bun is filled and shaped line them with squares of grease-proof or baking paper and place them in the basket of a steamer (detached from the steamer bottom) about 1 inch apart. Let them rest for 10 minutes but not more (if left to rest too long the buns will rise and flop after steaming). Meanwhile heat the water of your steamer to a rolling boil them place the basket of buns over the steamer pot and steam the buns for 10 - 12 minutes until risen and puffy.
I didn't count but this recipe definitely made more than 10 buns.
I used to spy these gems at Chinese grocery shops. They were sold amoung many other kinds of biscuits which were stored and displayed in gigantic glass jars with push-down galvanized caps, usually placed strategically at the open end of the shop and were sold by the catty.
Apart form Iced Gems we also had our local 'Oreos', our local Chocolate Bourbons, our local custard creams and our local Jammie Dodgers.....all being delicious legacies left behind by our then colonial masters.
KGB (not the Russian kind) manufactures these biscuits locally today, packs them in large square tins and places them on supermarket shelves. The only thing that's missing in them are Iced Gems and loads of flavour.
So this post was inspired by what I saw at Molliemakes. I now vehemently and officially declare Molliemakes as my number one craft magazine. Trust me ~
However, it wasn't as simple as getting the weighing scale out and dusting off the flour. I found a (only) recipe for it from a blog called Pimp That Snack. I must say they came very close in flavour to the real thing. The real thing meaning average. Let's face it...we bought these because they were pretty, adorable and colourful. And who could resist biting off that hard sugar dome which dissolved in your mouth after a few bites and crunches. I couldn't.
The most challenging part about making these Iced Gems was finding a small enough cookie cutter to cut out the rolled out dough into tiny half inch rounds.
After much hand wiggling and mind bending I settled for the round end of a large piping nozzle. I then had a hard time easing each dough circle out of the nozzle after every stamp. I used my clean fingernail. But ...yes I suppose they were worth the effort for Nostalgia's sake. Once the rounds were cut out i then used a fork to make the characteristic lines around the edges and pressed the circles down with my finger to flatten it a little before baking them. Jeeeez.
Iced Gems ~ the recipe ~
8 oz flour 1 T baking powder1/4 tsp salt 3 oz butter 1/4 pint milk
Pre-heat oven to 375 F, 180 C.
Place all dry ingredients into a large bowl. Rub in butter until the mixture is like fine breadcrumbs. Pour in 2/3 of the milk first and bring the mixture together to forma dough. If the mixture seems too dry to form a soft but firm dough add more milk. Roll out the dough on a floured board to about 1/2 centimeter thick. Cut into rounds about 1 cm in diameter. Mark the edges with a fork to make indentations all around the circles of dough and press down with your finger to flatten it a little because the cookie will rise upon baking. Place on a cookie sheet and brush with milk before baking for 25-30 minutes. take out from oven and cool before icing them.
Royal icing ~
450 gm icing sugar, sifted 2 egg whites 1 T lemon juice
food colours of pink, light green, violet and yellow
Whisk egg whites until frothy using a whisk. Stir in sifted icing sugar with a wooden spoon until smooth. Add the lemon juice and mix again. If the mixture seems too soft add extra icing sugar. the final mixture should be smooth but firm enough to hold a soft peak that doesn't flop over itself too much.
Divide the icing mixture into 4 seperate bowls and colour them accordingly.
Place each bowl of icing into a large piping bag fitted with a medium sized star nozzle. I used a Wilton 22 start nozzle. you can also use a plain round nozzle. Pipe dollops onto each of the baked and cooled biscuits.
Let the icing harden and then store in air tight containers.
Forgive me for the long silence. Things have been a little hectic. But I'm back and there is no better way to start off a-blogging than with these moist, scrummy and fudgy brownies.
These are the most delicious brownies ever! They're chocolatey, fudgy, slightly chewy, with that shiny crackly skin on the top. They are addictive. You can't stop at one. Swear to god. They are even better cold straight from the fridge and I've even had them half frozen from the freezer.
I had kept them in the freezer so we would not gorge on them in one sitting but apparently frozen brownies were even more engaging to eat. I don't think these brownies would ever get dry.
They were born from a small home business run by a young man who is an engineer by day and brownie baker by night. How more intriguing could that get? And they have crossed the seas to Singapore, Sri Lanka and Brunei.
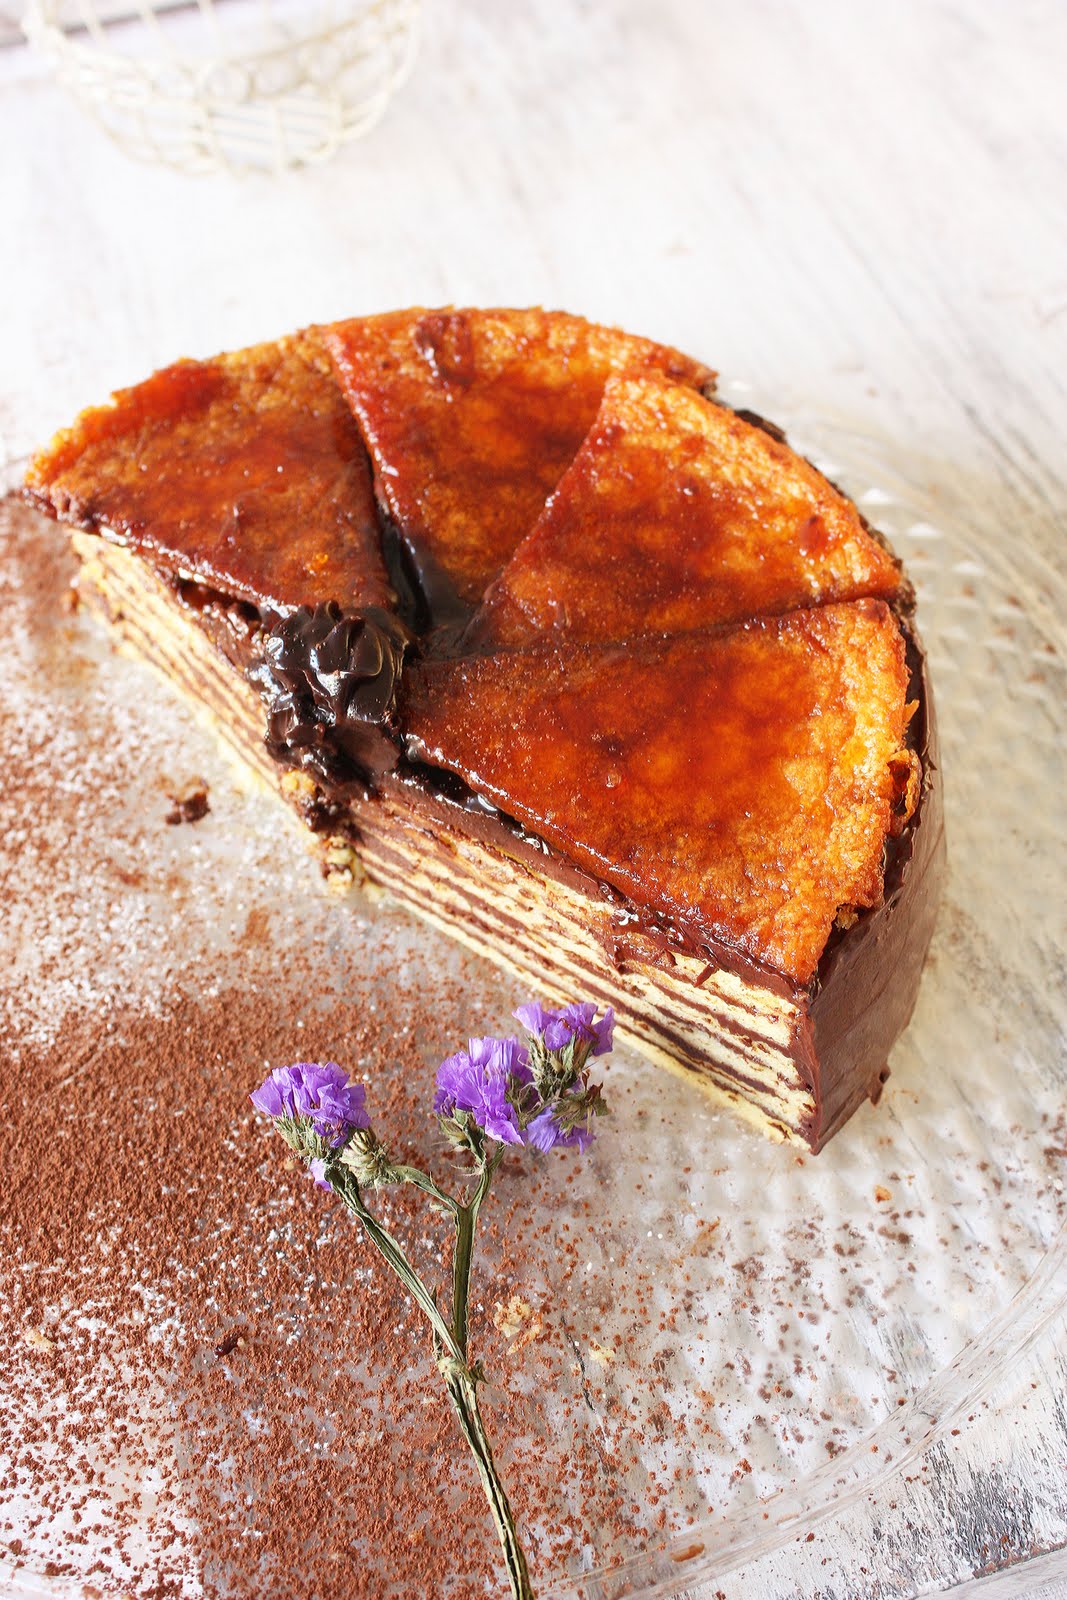
Seeing that I have only one one rack in my oven a Dobos Torte was not something I was keen to attempt. But I did it. In 4 hours.
The sponge layers took only 5 minutes to bake but must be watched and baking those thin layers should never be paired with accidental naps in between.
The chocolate frosting made me falter and I almost went for another recipe because 3 raw egg yolks could mean salmonella attacks, hospitalization and doctor's bills en masse. I decided to be brave and went ahead. We are all well, alive and hungering for more Dobos Torte. Thanks be to God.
I had cut the last piece of sponge layer into 8 wedges and seperated them a little before pouring the amber caramel over. One thing I learnt was that you only need to cut through the caramel when the caramel has hardened. With a very sharp knife. It is much easier than having sticky caramel globbing up your knife and gooey caramel threads stretching between your fingers endlessly.
A Dobos Torte looks much harder to make than it really is. And it is very very delicious and beautiful to look at. Maida Heatter's recipe is a winner. The birthday boys yummied it.
7 egg, seperated 3 egg yolks, additional 455 gm (1 lb) confectionaer's sugar (icing sugar) 94 gm all purpose flour 1 T lemon juice 1/8 tsp salt
Frosting :
227 (8 oz) bittersweet chocolate ( I used 60 per cent cacao) 226 (8 oz) gm butter 1 tsp vanilla 3 large egg yolks 2 T confectioner's sugar (icing sugar)
Caramel :
1/2 cup granulated sugar 1 T water
Make cake ~
Line, butter and flour well 8 8 inch round pans or 7 9 inch round pans. I only had 3 8 inch round pans so I had some relining and buttering and flouring to do.
Pre-heat oven to 450 F
Beat 10 yolks on high of an electric mixer for a few minutes until it turns pale and lemon coloured. Reduce speed, add sugar gradually and increase speed again and continue likewise until sugar is finished., and mixture is thick and glossy.
Reduce speed again and add flour gradually and then increase speed and mix for about 5 minutes. Add lemon juice and mix a few seconds more.
In a seperate bowl that is clean and dry beat egg whites until stiff peaks form.
Stir in a few tablespoons of the egg white into the egg yolk mixture to loosen the yolk mixture up. Then add the rest of the whites in 3 batches until the whole mixture is smooth. I used a wire whisk to do this.
Divide the batter into 8 or 7 portions depending on the size of your pan ( I weighed my batter) and pour into tins, leveling the batter and baking each layer for 5 minutes.
Keep the baked sponges aside and if you stack them please make sure you have baking paper in between.
Make frosting ~
Melt chocolate until smooth. Set aside to cool to room temperature. In a bowl of an electric mixer, beat butter till soft and smooth. Add vanilla and 3 egg yolks. Add sugar and cooled chocolate beating well until thoroughly mixed.
Spread this frosting thinly on each layer on cake leaving one layer unused.
Cover the whole cake with the chocolate frosting and chill in fridge while making the caramel layer.
Make Caramel Layer ~
Place the unused layer of sponge on baking paper. Cut the into 8 wedges. Seperate them a little. Meanwhile place sugar and water in a small pan and heat on high until the sugar melts and turns amber. Immediately take off heat and pour the caramel over the cut sponge cake.Let teh caramel cool and harden somewhat before cutting with a very sharp knife seperating teh wedges and neatening the edges if necessary.
I thought I could s'nail' this since arts and crafts has always been my forte but these flower or snail buns were quite a challenge. And chignons I have never made. Unlike Terri. So perhaps that explains why I was struggling. I almost didn't post these. Some of them looked ridiculously laughable. These were the best of the worst. N looked at me with a question mark on her face.
But I think they taste good. I'll know by sunset. I will have to re-heat them though. These are best eaten warm.
I have always loved Chinese steamed buns but especially buns with a spicy curry meat filling. Yes.... you cannot take the Malay out of me but there's always room for Chinese. And chocolate. And ice cream.
These would be good soaking up a curry I made last night. Oh. My. Yum.
Terri was spot on with the recipe. I used exactly 200 ml of water and I didn't need to add a drop more. I kneaded the pau dough in the machine until it didn't stick. I had no sticky problems. The dough was as good as a good dough could get. I too chose to use ordinary plain flour and not the fine, white special Hongkong pau flour. I find that buns made from plain four have more substance and flavour with a lovely cream-ish hue. The white ones seem bland in comparison.
This is a recipe I'll have written out and blu-tacked onto the kitchen wall in front of my work table. Yes I will.
350 gm plain flour or special Pau flour 1 tsp yeast 1 tsp baking powder 50 gm sugar 200-250 ml water 1 T vegetable oil or shortening
Sift flour and put into a bowl. Add all other dry ingredients including the yeast. Stir to mix. Add wet ingredients and knead on the machine until the dough is no linger sticky and can be pulled away easily from the dough hook.
If kneading by hand knead until smooth and not sticky. Place dough into a lightly oiled bowl and cover with a damp cloth.
Let rest for about 30 minutes (my dough needed about an hour).
Take dough out from bowl and divide into 50 gm balls or smaller, the size of golf balls). I made 40 gm balls of dough.
Take each ball and roll out into a small longish oval. Terri says about the length of your hand and 3-4 cm in width. Using a pastry scraper cut the dough lengthwise into thin strips about 1/2 cm thick or slightly thinner all the way. Brush the surface with vegetable oil lightly.
Pick up the strips of dough with both your hands (don't worry they won't fall apart unless you deliberately seperate them).
Twirl one end around your left thumb (if you are right handed) while pressing the end of the dough with your thumb and forefinger to anchor it. Continue twirling and covering the tips of your two first fingers and back around to your thumb again all the while gently stretching the dough with your other hand as you twirl. By now the dough would be twirled around most of your thumb and the top half of your first two fingers and looking like a cone or snail shell........hopefully.
Please do go over to Terri's blog to see her wonderful photographs. I had no one to ask to take photos while I was at it :(
When you reach the end of the strip tuck it in and under the base of the 'snail'.
Place on 5 cm squares of baking paper straight into a steamer rack but do not place the rack on the steamer bottom yet. Let rest for 10 minutes while you bring the pot of steamer water to a rolling boil. Then place the steamer rack of buns onto to the steamer pot of boiling water and steam for about 4-5 minutes.
I used a bamboo steamer. So indispensable. Why? Go here.
I have never been a fan of bombs. Because of that I have never attempted to make them. Generally speaking I like dainty and pretty food which explains why I like desserts. Or at the least I like making them. I like looking at them. But when they look like 'bombs' and are huge the interest wanes.
But when I saw these here on this very practical and interesting blog of Lily Lai Sek Hong's I thought they looked quite appetizing. Although I do think that the name is a little outdated by now. These days their namesakes come in all shapes and sizes. Anything but round I believe. But having said that I can't think of a better name at this moment. So bombs it is.
I followed Lily's recipe largely. Particularly the recipe for the dough. It turned out pretty good but I think H was expecting something more chewy. I watched the back of his head from the kitchen while he ate it and waited for that mmmmmm....sedapppp...but it didn't come.
H was, I know, expecting the other 'bomb'. His favourite cake. The one with the red bean filling. The dough of which is made of pure glutinous rice flour thus making it really chewy and stretchy when you sink your teeth in and pull it away from you. The Chinese Jin Dui.
But these are sweet potato bombs. The dough less chewy in texture than the Jin Dui cakes but both nutty because of the sesame seeds. These, however, had a coconut-ty, juicy and sweet filling of freshly grated coconut cooked in a palm sugar syrup. (My favourite kind of filling). Jin Dui and these look identical. But they are different cakes so it is unfair to compare. I'm sure these taste like they are supposed to taste. I can't really tell because I have never eaten one before. But if Lily's blog is anything to go by I know that this recipe is true.
As a whole these are not one of my favourite local cakes and neither are the Jin Dui-s. But like they say....you must try everything. At least once. Or you have never lived. Or blogged.
Place palm sugar and water in a small pan over small heat. Stir to dissolve the sugar. Put in the grated coconut and salt an mix in until the coconut is covered evenly by the syrup. Add glutinous rice flour and mix well again. Take off heat and allow to cool.
Sweet potato dough
I have converted the measurements to grams
600 gm of sweet potato that has been baked till cooked, cooled completely and mashed, ( or about 3 cups) - I used the yellow kind
140 gm plain flour
117 gm glutinous rice flour
1 tsp salt
2-3 T water
Mix mashed sweet potato, flours and salt in a bowl and rub the mashed potato in until it is somewhat mixed. Put in 1 tablespoons of water first and knead a little to bring the mixture together. If necessary add 1 or 2 more tablespoons of water and knead until a smooth ball of dough is formed.
Pinch off golf ball sized dough one at a time and flatten it out into a disc. Place a teaspoon of the coconut filling onto it and pinch the edges to seal and shape into a ball again.Place on a large tray and continue to use up the rest of dough and filling in the same way. The amount of dough and filling were perfect. I got 21 one balls with only a pinch of dough left over. Each 'bomb' was about 11/2 inch in size (diameter).
When all have been shaped fill a small bowl of water and place on the counter where you are working. Pour about a cup of sesame seeds into a flat dish or shallow bowl and place it on the counter too.
Dip each 'bomb' into the water and then into the dish of sesame seeds. Roll around the bomb with your dry hand to coat. Keep each coated bomb aside on a tray and continue with rest of 'bombs' in the same way until finished. Top up the dish with more sesame seeds if necessary.
Heat oil in deep pot for deep frying. When oil is hot drop in several 'bomb's in but do not overcrowd otherwise the dough will get soggy. Lower the heat to medium so that the sesame seeds will not brown too quickly before the dough gets cooked through. When a light golden brown (about 5-7 minutes, I didn't count) lift off the bombs with a slotted spoon and drain on kitchen paper.
Serve warm or at room temperature.
PS: H liked these after all. He says they are easier to eat.