Monday, August 31, 2009

I'LL BE BACK


Hi everyone! I'd like to thank all of you lovely people who have been visiting my blog and to all those who have left precious comments for the past (almost) year since I started this blog. It has been a tremendous experience and joy and with God's will there will be many many more posts coming up.

However, I'm planning to take a little break from blogging for a short while. Things are getting a little busy and slightly overwhelming in my real life tangible existence and juggling too many things is just not my forte.

So as much as I'll miss all of you my dear and lovely blogger friends and visitors I'll be off for about a few weeks..... and very likely off the comp too except to check for emails of course.

I'll be bouncing back though and hope by the time I do you will all still be here...:))

Do take care. I'll miss you.

Sunday, August 30, 2009

THANK YOU FOR THE AWARDS

I'm sorry..... I would have been back a little sooner but Life got in the way.

But I'm back and since I have to re-do 2 posts that I had clumsily deleted I'm going to make this somewhat short a get straight to the point.

I'd like to thank Cherry-Potato for the Kreativ Blogger Award.....Cherry potato is a young mom with a passion for cake decorating and she's doing it soo well! Check out her blog for some wonderful cake decorating ideas.


and Tracie and Elin for the I heartyour blog award awards....


Tracie has such a passion for cooking and baking for such a young person that I'm always amazed. And her photographs are beautiful too.

And Elin.... What can I say...the great cook and bread lady who is always coming up with new recipes and funny stories. Love her blog...... and her too.

It makes blogging so much more fun to have come to know such wonderful people as they and so many more and of course to receive lovely 'awards' from them makes blogging that much sweeter. Thank you all soo much for thinking of me. :)

I am going to pass the Kreativ Blogger Award and the 'I heart your blog' award to

The Little Teochew
Cake on the Brain
Diva of Sugarbar
Kitchen Snippets
Cherry-potato
Ninette of Big Bold Beautiful Food

Basic rules are to pass on the awards to at least 8 to 10 other blogs that you love, link them up on your blog and leave a comment on those blogs that you have passed the award to.

So I'm breaking a few rules here but nevertheless the awards go on. :)) Keep on blogging! :))

Saturday, August 15, 2009

TRIPLE CHOCOLATE LAYER CHEESECAKE


With 2 cheesecakes, 1 tray of brownies (by accident), 1 platter of steamed crabs, 1 platter of oyster sauced beef fillets with snowpeas, 1 platter of crispy fried squid rings, 2 presents and an aloof cat we had a little family do for 2 of our sons birthdays which happen to fall on the same day.

Some years ago and a few weeks before the big day I knew in my heart of hearts that, with God's will, our youngest son was going to share the exact same birthday with his eldest brother. I was right.

Our youngest son arrived, bawling, on the 15th of an August day, just like his brother.


So with 2 impending birthdays looming up ahead I baked 2 birthday cheesecakes. One was a Cappuccino Cheesecake like the one I have posted before and the other was a Triple Chocolate Layer Cheesecake that I have been meaning to try but have never gotten around to..... until my boys approaching birthdays have finally pushed me to the edge, made me haul my Old Faithful cake mixer off the shelf, scrutinize the recipe, engage my brain to fiddly and make a Triple Chocolate Layer Cheesecake.


And it was worth it. It was beautiful and utterly delicious!

Four chocolate flavours in one cheesecake. Heaven, Nirvana and Paradise and a Utopian Oreo bottom. It uses no egg, is chilled as opposed to baked and it almost liquified as soon as it entered my mouth when I took a forkful. It was very mousse like in texture, utterly creamy without being sickly rich but worst of all I couldn't stop ladling more forkfuls of it into my mouth and I could not stop my cheesy mind from wandering to its picturesque layers.... as pretty as a chocolate rainbow.


Here's the recipe........................
130 gm Oreos without the cream
70 gm butter, melted

Filling..

6o ml water
1 Tbsp gelatin
380 gm cream cheese
125 ml milk
1/2 cup castor sugar
60 gm each of white chocolate, milk chocolate and dark chocolate, all melted seperately in individual bowls
250 ml of cream, whipped

8" inch cake tin with a removable bottom, greased.

Crush the biscuits in a medium bowl using the top part of a pestle until fine. Add melted butter and mix until the crushed cookie are evenly mixed with the melted butter. Press into the base of the cake pan to an even layer. Refrigerate 30 minutes or longer until firm while you make the filling.

Filling....

Place the 60 ml of water into a small bowl and sprinkle gelatin over. Place the bowl in a pan of boiling water. Stir s little and let stand. The gelatin will dissolve.

Beat cream cheese in a mixer till soft. Add sugar and beat again. Add milk and beat. Divide mixture equally between 3 bowls.

Fold white melted chocolate into one bowl of cream cheese mixture and mix until smooth. Fold milk chocolate into another and mix as well. And add dark chocolate to the last and mix well.

Divide the gelatin into 3 portions and add each portion to each of the cream cheese mixtures. Mix well. Then divide the whipped cream into 3 portions and add each portion to each of the cream cheese mixture. Mix well.

Pour the white chocolate cream cheese mix over the Oreo cookie base and spread evenly. Let it firm up a little while in the refrigerator (about 15 to 20 minutes) and then pour over the milk chocolate mix, spread evenly and let that firm up as well and finally the pour over the dark chocolate mix and spread evenly and let chill overnight or a few hours until set.

Remove from cake pan carefully by loosening the sides with a thin palette knife, decorate with clouds of whipped cream if you like and serve. YUMMM...


Saturday, August 8, 2009

CHEESY GARLIC BREAD


I have actually made 3 trays of this bread in the past 24 hours, between yesterday and today, for dinner/snack, for lunch and now for snacking again (with 4 resident and constantly starving men hovering in the home making snacks can be quite an obsession).

I now, however, find myself quite enjoying bread making. It isn't as tiring as I always think it is and there is a certain satisfaction that the kneading, the waiting and the rising of the dough gives that I cannot get out of baking cakes and cookies or from cooking stir fries or sauteeing sambals. Plus it is not as unhealthy either so its easy on my conscience. I know that I'm not stuffing the people I love with too much fat or oils or sugar whilst filling them up.

I would describe this bread as a very full, compact and densely-soft pillow, crowned with a garlicky and cheesy crust.

It is not a light fluffy bread like the Yoghurt buns I made before but is instead a perfect bread to dunk chunks of into a piping hot, creamy soup or into a hot and spicy curry sauce (as Malaysians would) for breakfast or for salads and barbecues because of its denseness and crusty top or just for snacking on.

It is the best garlic bread I have made so far only this time it's with a cheese topping and it is as rustic as I can ever imagine garlic bread to be.


With bits of thyme sprinkled on the top it gets a lovely extra edge of flavour. This is a recipe from the Good Food magazine that I had bought a backdated issue of at half the price.

Here's the recipe.................


500 gm bread flour
7 gm dry instant yeast (I used about 2 tsp)
1 tsp salt
2 Tbsp olive oil
1 Tbsp honey
2 garlic cloves ( I used 5), crushed and chopped
25 gm butter, softened
100 gm cheddar cheese, grated
handful of thyme leaves

Measure the flour, yeast and salt into a large bowl. Mix 300 ml hand hot water with the oil and honey in a jug, then pour into the dry mix, stirring to make a soft dough.

Turn the dough onto the table and knead for 5 minutes until smooth then place in a lightly oiled bowl to rest for 30 minutes or when poked with a finger the indentation stays. This is so that it will be easy to stretch to fit the tin later.

After 30 minutes take it out of the bowl and punch it down to rid of air. Knead 2 or 3 times and then place in a lightly oiled or parchment paper lined swiss roll tin and stretch to fit. You can do this by pushing the dough outwards with your the tips of your fingers from the centre and when it almost fits you can pull the corners to fit the tin snugly.

Mix the soft butter and chopped garlic to a paste and spread over the dough. Grate the cheese over the dough and then sprinkle with thyme.


Bake in a 170 C oven for 30 minutes and the top is a lovely golden brown.


Cut into squares or rectangles and serve with a creamy soup.


Wednesday, August 5, 2009

SOFT YOGHURT BUNS


You may be thinking "Oh no not another bun recipe!"

And I'll be thinking, " Foodies don't lie."

And you'll be saying, "What?"

You'll look puzzled and you might roll your eyes.

But I'll smile, cock my head, feel content and think, " Foodies don't lie." And I'll slump slightly and sigh....with a smile brushed across my face for the rest of the evening...feel content...and dreamily think, "Foodies don't lie."


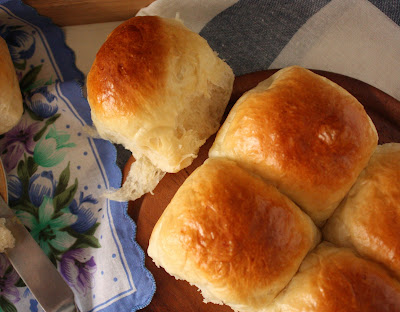
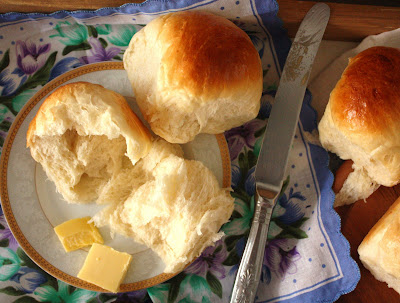
Because Elin of Elinluv's Tidbits Corner wasn't fibbing when she sighed about what a fantastic bun recipe this was...how tender it was and how her whole evening was spent swooning and sniffing over the buns just as I'm doing right now.

God
, foodies don't lie.

And if the great bun lady (Elin) says it's good it just has to be good. So I did it, I tried it, I made it and I LOVE it. It's fabulous. It is everything Elin said it was. She sure don't lie.


KWF of Pure Enjoyment don't lie either for this is where Elin got the recipe from. Thank you both for such a luscious bun recipe.


But where both Elin and KWF used a fruit flavoured yoghurt to flavour the buns, I did not. I used low fat yoghurt simply because that was all that I had in the refrigerator and it worked just fine....just GREAT.


And where Elin and KWF sprinkled their buns with sesame seeds I did not because I did not have any. But they were GREAT even without.


Here's the recipe for 6 buns............I doubled it and got 12 golden gorgeous buns in and I used an 11" by 9" pan
250 gm bread flour
15 gm sugar
3 gm salt
3 gm yeast
100 gm yoghurt (I used plain and low fat)
60 gm milk
25 gm egg (1/2 egg)
30 gm butter

Mix all dry ingredients in one large bowl.

Put all wet ingredients and butter (except egg) in a small pot and warm it up over a small fire until lukewarm (not too hot or you'll kill the yeast). Take off from the fire and mix with a wooden spoon.

Break egg in a small bowl and beat lightly and quickly pour into the wet mixture and stir quickly and then pour the whole mix into the dry ingredients. Stir with a spoon until the flour is incorporated and a rough dough forms. Now use your hands to bring the dough together and turn on to a lightly floured board and knead for about 6 to 8 minutes until the dough is smooth and elastic.

Lightly oil the bowl and place the kneaded dough inside, cover with a damp tea towel or cling film and let rest for an hour or until the dough doubles in bulk.

After the dough has risen take it out from the bowl and punch it down to rid it of air and knead it a little while, about 1 or 2 minutes and then roll into a log and cut into 6 pieces or 12 if you have doubled the recipe like I did. Shape each piece into a smooth ball and place in a pan (lined with parchment paper at bottom and sides) slightly apart (about 1/2 inch apart). Leave to rise until it doubles in bulk again. Brush the tops with egg wash (a beaten egg) and bake in a 170 C oven for 20 minutes.


Monday, August 3, 2009

CASHEW NUT CHICKEN STIR FRY


Terri don't laugh. This is my attempt at a Chinese stir fry. I love stir fries.... the only downside being I'll be at the dinner table sweating like someone had left a tap running on me head. Terri's the sifu of Chinese cooking and her dishes and her endless treasure box/blog of hints and lectures have always intimidated me. However I didn't think I could go much wrong with a cashew nut chicken stir fry because cashew nuts are so delicious just as they are and oyster sauce is a life saver. Anything with oyster sauce and cashew nuts just has to be good.


The dish is a tad colourful, being me, but pretty pretty tasty especially when I splashed in some zingy fish sauce as well. So maybe it's not exactly Chinese after all....it's a little bit Thai, a little bit Chinese and a little bit me.

Here's the recipe. Serves 1 or 2..........


1 chicken breast, sliced thinly
2 cloves garlic, smashed and chopped
1 small green and red pepper, cut into small chunks
a handful of roasted cashew nuts

Season chicken slices with :

1 tsp light soy sauce
dash of white pepper
salt
1 tsp sugar
1 tsp cooking oil
2-3 drops of sesame seed oil
1-2 tsp cornflour mixed with 2 tsp water

Sauce ingredients :

2 tsp oyster sauce
1/2 tsp fish sauce
43 - 4 Tbsp water
1 tsp cornflour plus 1 tsp water, mixed

Cooking oil

Season chicken pieces with the seasoning ingredients. Mix well and keep aside for about 10 minutes.

Prepare the sauce ingredients in a small bowl. Keep aside.

Heat up a wok. Put about 4 tablespoons of oil in and let that heat up till very hot. Fry the chicken pieces in 2 batches very quickly, about 5-6 seconds until the chicken turns white but no need to worry if it not completely cooked. Lift out and drain them of oil. Keep aside.

Remove excess oil from the wok leaving a tablespoon in. Throw in the garlic and stir it around until it turns soft and fragrant. Pour in the sauce ingredients and stir a little to mix. When sauce begins to bubble throw in the fried chicken pieces and stir quickly for 4 - 5 seconds, add the peppers and stir over very high heat for another minute. Throw in the cashews. Taste and adjust. Serve hot.

LinkWithin

Related Posts with Thumbnails