Showing posts with label Savories. Show all posts

Tuesday, October 18, 2011

STEAMED BAU WITH A CHICKEN CURRY FILLING


Here's a fictional bau story and a true recipe.


A Bau Story ~ (or skip it) ~


It's hard to picture bau on a plate and Dad on a chair together, face to face. But curry was a different matter altogether. He had to have it everyday. Like water. Especially a fish curry. So if Mom asked (which she would do almost everyday) what she should cook with this or that, accompanied by a plagued and tired look on her face, Dad would simply answer "curry" without flinching, without looking, without thinking. You would think that that would be the end of Mom's problems. But no. That was her problem.

Was that why she left him? We often wondered. Because right after she did she abandoned curry and went for bau. Bau this, bau that, it was bau, bau, bau. 

Finally, exasperated, Janna asked her one day after school 


"What's with the bau Mom? " 

"This is the one thing your father hated. Bau. And I hated all that curry. Everyday. To cook, to eat, to cook, to eat. Why do you think I left him? "

Janna who was strangely unaffected by our parents' divorce until that moment glared at Mom through her dark, almond eyes from behind her thick fringe. Yes, it was a long fringe that she grew so she could stare at a boy at school without looking like she was staring at a boy at school. Then she got up, scraping the kitchen chair backwards against the floor, stomped over and reached for a pau. As soon as she snared it in the palm of her hand she headed for the kitchen door, opened it and stood there for a moment as if debating if that was the right thing to do. Then with a fling of an arm the white, round bun flew like a jet plane and crashed into the Cat's Eye tree about 10 meters away. Leaves rustled, birds flitted, bird wings flapped and Mom opened her mouth to start a cry of astonishment that didn't come. That was when my older sister walked out, lived with Dad and never came back.

Ever since then Mom started making bau with a curry filling. She made it like a machine, emotionless, her fingers deftly pleating white circles of dough over a crimson, spicy filling, her dark eyes blank, her lips a line, almost as if defiance and submission had fought out a duel and neither won. I would watch her and feel my mind wander. Was this what life was all about? Curry or Pau? Either this or that? Or this and that? Or this with that?  Often in bed I would shake my head in the void of the night so that those confounding and senseless thoughts would spill out and things would be right. It never did. Then one day, two years later, Mom whispered in a wasted and dying voice, 

" If you hate something bad enough it will surely come back and haunt you." 

With that she let out her last breath, closed her eyes and died before me. I felt her dry hand go limp in mine. I looked down at the dead tributaries of bumpy veins embossed on the back of her hand. I ran my finger along one of them, slowly. And in that silence, alone with my dead mother I heard my heart thumping and felt my temples being squeezed by God.

I have never, since, hated anything as badly as I hated my mother at that moment, and myself, for not figuring it out. So that she could have saved herself. Because it was not the bau or curry after all. It was hate that consumed her life.  


And Janna knew.

Therefore I am now.....balanced.


love Bau and Curry. Curry with Bau, Bau or Curry, Curry over Bau, Bau over Curry, Curry inside Bau. I love bau. And curry. :)


The recipe ~

The bau recipe is from my previous post taken from Terri's Hunger Hunger

Chicken curry filling ~

370 gm chicken breast, skinned and diced
1 large medium onion, diced
2 cloves garlic, minced
1 cm ginger, minced
1 - 2 T curry powder, any, mixed to a slurry with 2 T water
1 T cornstarch mixed to a slurry with a little water
1-2 T cooking oil (I used vegetable oil)
1-2 T oyster sauce
salt to taste

Heat the pan and then add the cooking oil. Throw in the diced onion, garlic and ginger and saute until fragrant or the onion pieces turn translucent.

Add the slurry-ed curry powder and stir and watch carefully so that the paste doesn't burn. Add the oyster sauce. Add the diced chicken, mix well and then add salt to taste. you may add a little water if the mixture seems dry.

Finally pour in the cornstarch slurry and stir quickly so that the sauce won't get lumpy. Taste again and adjust salt.

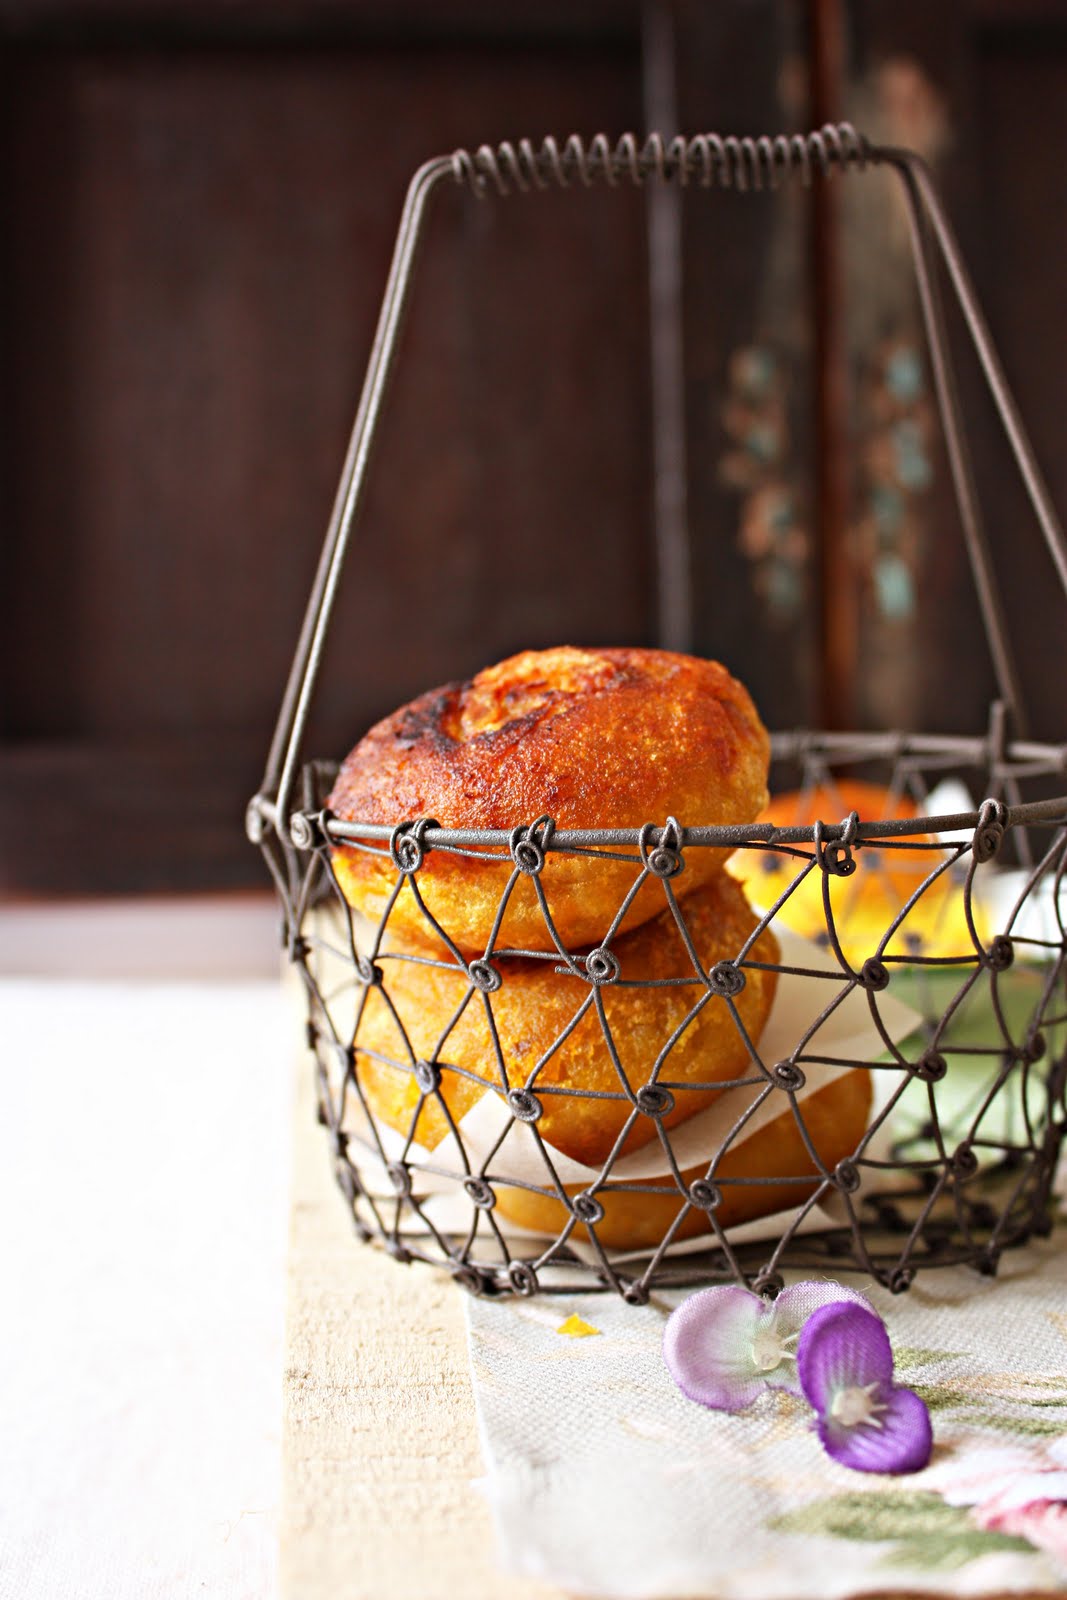
The final mixture should be a thick curry almost a paste with diced chicken in it. ...like spaghetti sauce or sambal.

To make buns ~

Tear off pieces of risen dough into 50 gm pieces. Roll into a ball and roll out with a small rolling pin on a floured board into a small circle about 3 inches in diameter. Thin the edges by lifting up the circle of dough and pressing the edges with your thumb and first two fingers all around the circumference. Then place the flattened circle of dough onto the palm of your hand.

Then using a teaspoon scoop up some filling and place in into the centre of the dough. Start pleating the edges like in this video. :)


I made a mess . Some of the curry sauce leaked out while I was "pleating" and my 'pleats' were not exactly pleats. But who cares :)


As each bun is filled and shaped line them with squares of grease-proof or baking paper and place them in the basket of a steamer (detached from the steamer bottom) about 1 inch apart. Let them rest for 10 minutes but not more (if left to rest too long the buns will rise and flop after steaming). Meanwhile heat the water of your steamer to a rolling boil them place the basket of buns over the steamer pot and steam the buns for 10 - 12 minutes until risen and puffy. 


I didn't count but this recipe definitely made more than 10 buns.


Thursday, October 13, 2011

RACHAEL RAY'S AGLIO OLIO (GARLIC & OIL) WITH SPICY SHRIMPS & SWEET PRESENTS


I love Aglio Olio...


I love colours and...


I love Pinterest. Why didn't anyone tell me that Pinterest could be so addictive? To the point of ridiculousness. Yours truly now needs a neck brace. And a good spanking.


Oh and I love presents.


J had given me these from her travels to Italy and Spain recently. How sweet ~ as sweet as the presents.....rainbow coloured pasta and a delicious looking red pesto sauce in a cute little jar. The pasta colours were all natural :)


I'll use the pesto sauce tomorrow but for today I was craving some Aglio Olio.....my favourite way to cook pasta...forever.


A, my sis, had also given me an enchanting kitty dish cloth  she had bought in Perth ...and which I'll never use as a dish cloth of course. I never use presents in a way that will make them wear out. I like keeping them like little treasures for important 'little moments'...... unless they are to be eaten of course.


N the girl had also given me a stack of beautiful Japanese plates and bowl "for your food photography"....so I had used them for some food photography as suggested. 


Aren't people nice? :)


Rachel Ray's Aglio Olio scored five stars. I just had to try it.


I quartered the recipe and used coriander leaves instead but this is the original ~


The recipe ~


Aglio Olio and Spicy Shrimp


Spicy Shrimp :


1/2 kg jumbo shrimps
1 lemon, juiced
1/4 chopped flat leaved parsely
1 tsp crushed red pepper flakes
4 cloves garlic, crushed and peeled
coarse salt, about 1 tsp
2 T extra virgin Olive oil (evoo)


Aglio Olio :


1/4 cup evoo
1 tin anchovy fillets ( I did not use this..I'm sure it made a difference)
6-8 large cloves garlic, peeled and minced
1/2 tsp crushed pepper flakes
1/4 chopped flat leaf parsely
coarse salt
500 gm spaghetti, boiled until al dente


tomato and onion salad on the side
crusty bread as accompaniment


Combine shrimp with next 5 ingredients and toss to coat evenly.


Heat a large frying pan add the oil and fry shrimp in 3 seperate batches. Fry until the shrimps just turn opaque, lift it out and keep aside.


Return pan to heat, add 1/4 cup olive oil, add anchovies, garlic and pepper flakes. Break up anchovies until they break up and dissolve into  the oil and garlic mixture.


Toss spaghetti in the pan with parsely and garlic oil, then season with salt to taste. 


Serve spaghetti and onion and tomato salad and crusty bread if you wish.


Wednesday, May 4, 2011

SPICY PRAWN-COCONUT FILLING IN SWEET POTATO DOUGH ~ CUCUR BADAK


I craved these Hippo bites so badly that I had forgotten to measure the ingredients before making them. By the time I did I was halfway through.

These are literally called Hippo Bites. Because by Malay standards they are big. Cucur or bites of any kind, sweet or savoury, are usually made in dainty bite-sized pieces so that you could pop the whole thing into your mouth in one go ~ without looking like you have just bitten off a hunky chunk of a hippo. But these are made bigger. So relatively speaking these are hippo bites or cucur badak.

Those bright tumeric-yellow cake cups come from Sarah-Jane siliconemoulds.com Gorgeous yellow no?


I LOVE these and I have an all time craving for them. Freshly grated coconut is sauteed in a mixture of pounded onions, chilly and dried shrimps, diced fresh prawns, sliced lemon grass and some tumeric. The dough is the exact same dough used for the kuih keria or sweet potato doughnuts. And also deep fried. A subtle sweet, chewy crust hiding a spicy coconut shrimp filling inside. Wooooooo...... I LOVE. 


Recipe ~

Sweet potato dough ~ same as sweet potato doughnuts without the sugar scabs. You might want to double the recipe..

I can't promise that the amount of dough will match the amount of coconut shrimp filling. You might end up with extra filling as I did. Freeze it for making more another time. 

1 1/2 cups of steamed, completely cooled and mashed sweet potatoes ( I used slightly more than 1 1/2)
About 3/4 cup of plain flour or less
1/2 tsp salt


Mix all above ingredients together until it becomes a firm dough.  

Filling ......approximate values ~
3-4 shallots, peeled and sliced
2 garlic
3 slices fresh ginger
2-3 red chillies
3 heaped tablespoons of dried shrimps, re-hydrated
1 tsp tumeric powder or 1/2 inch fresh tumeric 
6-7 prawns, shelled, de-veined and chopped finely
1 large or 2 skinny lemon grass, the white part sliced finely
2 T cooking oil, any vegetable oil
21/4 cups of freshly grated coconut


Pound the onions, garlic and dried shrimps and fresh tumeric if using, in a pestle and mortar, until it becomes a moderately fine mush. 

Heat a pan. Pour in the cooking oil. Saute the pounded ingredients, and powdered tumeric at this point if using, until fragrant and turning lightly brown around the edges.

Add the diced fresh prawns, sliced lemom grass  and stir to mix in and until the prawns just turn pink. Add the grated coconut and mix well over low heat. Add a touch of water if the mixture seems a little dry. The mixture should be moist but NOT wet. add salt and pepper to taste. Leave aside to cool.

Shape the dough into balls the size of ping pong balls or perhaps slightly larger. Make a spacious depression in the centre and fill with the coconut-shrimp filling. At least a heaped teaspoon of it. Cover up and seal. Shape into a ball and then flatten it so that it looks like a fat chubby disc.  Keep on a plate and finish off the rest of the dough and filling. Any extra filling can be frozen and then defrosted to be used when you make more next time.

Heat medium pan. Add cooking oil to about an inch deep. Heat the oil till hot. Fry the cucur badak until a deep golden brown. Drain on kitchen paper to rid of excess oil. Serve warm or at room temperature. I like it at room temperature.


I am submitting this to Malaysian Monday. Sharon from Test With Skewer is hosting the next Malaysian Monday. Find out more about Malaysian Monday here.

Wednesday, July 7, 2010

A PESTO PIZZA WITH JAMIE OLIVER'S PIZZA DOUGH


I don't quite like red pizza sauce on pizzas. Just like the guy who does not like green eggs and ham. But, Sam-I-am, I do like green pesto sauce on pizzas. I like it so much that I'll....

.... have it on a boat, 
I'll have it in a coat, 
I'll have it day and night 
'specially if I'm a goat. 

I'll have it while I think
Or even while I blink
I'll have a thousand times a day
Especially when I'm Queen

I'll have it on my blog
I'll have it while I slog
I'll have it all the time
Especially when I'm bored

So that is what I've made today
A crispy crusty pizza dough
With green sauce of pumpkin seeds
and some happy C-lantro

Green sauce on pizza dough.
A disc that fell from heaven's place
And landed, thankfully, in my face.

  
Jamie's pizza crust is seriously good. Crispy and crusty and easy.

Jamie Oliver's pizza dough recipe ~ I made half and I got 8 pieces of 7 inch pizza bases (I freeze the extras).

7 cups bread flour or
5 cups + 2 cups semolina
1 level T sea salt
2 (11 gm) packet instant yeast
2 T raw sugar ( I used white)
4 T extra virgin olive oil
2 1/2 cups lukewarm water

Mix flour and salt in a bowl. Push aside. Put in the yeast, sugar and olive oil into the lukewarm water and mix well. Let stand a few minutes. (I left it for five because I couldn't wait any longer than that).

Pour the flour/salt mix onto a board or table and make a well in the centre. Pour in the liquid ingredients and slowly using a fork, let the flour at the sides of the well fall into the liquid until all the flour have been incorporated. 

Use your hands now and bring the dough together and knead until the dough is smooth and elastic. I kneaded for about 10 minutes by hand. Add flour a little at a time if the dough is too sticky but be wary. Do not add too much. Just flouring the board occasionally and flouring your hands well and kneading lightly should be sufficient. Once done let sit in a lightly oiled bowl, cover with a damp tea towel (clean) and let rise for an hour.

Once doubled in bulk and it does not spring back when you make a belly button, take it out from the bowl onto a table top and punch it down to rid of air. Divide the dough into portions depending on how large or small you want your pizza to be. Roll each piece into a smooth ball and then flatten with your hand into a thick disc. Then roll it out on a floured board until you get a thin circle of dough as thin or thick as you like. I like thin.


Build the pizza ~

Pumpkin seed and cilantro pesto (adapted from Pam's of Sidewalk Shoes) 
Halved cherry tomatoes
Crisp fried local anchovies
Basil leaves
Mozarella cheese

Preheat the oven to the highest setting. Slip in a baking tray (upside down preferably) if I you don't have a pizza stone. Let it get really hot, maybe 10 - 15 minutes while you prepare the topping.


I lay the pizza dough disc on a piece of parchment paper a little larger than the pizza dough itself so that I could easily lift the topped pizza onto the baking tray by lifting the sides of the parchment. Spread the pesto over the dough. I topped the pizza with halved cherry tomatoes, crispy fried local anchovies, basil leaves, and then mozarella cheese. SERIOUS YUM.

Lift the pizza by holding on the sides or corners of the parchment paper and slip it on to the baking tray. Bake for about 10-15 minutes or until the edges of the pizza crust are golden brown and crunchy. YUM YUM. 


I am submitting this to Yeast Spotting !

Friday, March 19, 2010

GLUTEN FREE KOREAN PANCAKE


 Warning : Healthy Recipe Ahead! 

Don't be alarmed..... I'm not turning vegetarian or vegan. But I do enjoy some vegetarian food and sometimes I'm stunned how satisfying and lip smacking they can be. 

I remember the the sambal tempe, the dhall curry, the spiced chickpeas, the kimchi, the chutney, the spring rolls....Oh my god I counted and I actually have 20 vegetarian dishes on my blog!! 

Perhaps I'm in the process of evolving into one. Perhaps.... I'm healthy! GASP.


Divina of Sense and Serendipity has smitten me yet again with her fabulous and healthy recipes. It all started with the beautiful Mochi Chocolate truffles (well, ok, that's not exactly healthy. It's fabulous), then the sensational Tofu crusted in Bonito Flakes and now some fantastic Gluten free Korean pancakes. All from her beautiful and educational blog. 

And the fact that she has the wonderful gift of making all her healthy food look unhealthy doesn't hurt either.

Completely gluten free this pancake uses mung beans or yellow lentils and rice and includes a whole lot of vegetables to pack in all those heavenly flavours. 

It makes you feel that this is what breakfast could be. This is what lunch could be. This is what dinner could be.......this is definitely a pancake that could be. Good for you. 


It is also very adaptable to tastes. You can almost add anything else you fancy or heaven forbid make it high cholesterol and unhealthy by adding prawns, minced meat or top it with a poached egg (which I tried). I can't poach an egg. I tried and it looked weird. It had entrails.

Enough said ...here's the recipe, adapted a little,....from the wonderful Divina of Sense and Serendipity..... 


1 cups mung beans (skinned) I used yellow lentils
1/2 cup jasmine rice
1 cup water 
1 mediumm zucchini, cut into matchsticks
1/2 carrot, cut into matchsticks
3-4 stalks spring onions, chopped
1/2 red pepper, chopped
a small bunch of coriander,chopped finely
salt
cracked black pepper

vegetable cooking oil


Soak mung beans (or lentils) and rice overnight.


Drain them the next day and place into a blender with1 cup of water. Blitz until it becomes a thick batter like pancake batter.If too thixk add extra water a tablespoon at a time until it reaches the desired consistency.


Sprinkle the shredded zucchini with about 1 tsp of salt and let it stand for about 20 minutes. Squeeze out excess liquid.


Add all the vegetables to the batter, add salt n pepper to taste. Mix well.

Heat up pan till very hot then add 1 tablespoon of cooking oil (I used grapeseed oil) and swirl it around the pan.

Ladle the mixture into the pan giving each pancake about 4 tablespoons of the mixture depending on how large or small you want the pancakes to be. I used an egg ring mould but it is not necessary at all.


When little bubbles become visible on the surface flip it over and cook until a golden brown on both sides.


Do the same with the rest of the batter.


Serve with a dipping sauce like this or with kimchi like I did or just enjoy it as is which is also perfect!!


Monday, February 1, 2010

LACE CREPES ~ ROTI JALA


This was my father's favourite must have for the festive season and I remember mother sitting on a squat stool in front of a very low stove (she did not want to stand for hours) assembled as a temporary stove the night before, probably by my father, and twirling roti jala-s on the morning of raya.....


....agitated and stressed out..... because she had to make quite a fair bit and then rush to take a shower, put on her make up, do her hair and slip into her prettiest dress so that she looked breathlessly beautiful before the guests arrived. (Pun not intended)


I don't blame her. Because to make a fair amount of roti jala takes up quite a lot of time.

And in those days you couldn't simply step out the door and buy food. These, however, are sold by the kilo nowadays by housewives who run little home food catering businesses. Very convenient.


Or do like I do. Make them ahead of time, freeze them, thaw them and when the day comes steam them, in small batches at a time, a few hours before you're expecting your guests.

These are served cold with a warm beef or chicken curry so there is no worry about keeping the roti warm. 


The making of roti jala is therapeutic but only when it's not done under the duress of time.

It's all in the wrist. It uses a simple plain crepe batter only slightly runnier so that it flows smoothly and unhindered through the spouts of the roti jala mould. 


I enjoy the twirling of the mould, feeling the flow of the batter push through the spouts, the dancing of my wrist, watching the delicate lace pattern appear on the griddle, folding and rolling the dainty lace-work and then seeing the pretty pile grow higher and higher. I can be so silly. True.

The recipe ~


Flow' and 'Smooth' would have to be the keywords for this recipe because if you don't have a satiny smooth completely lump free batter you will not have the batter flowing freely through the tiny spouts of the mould. And your experience would be far far away from therapeutic. Trust me. 

The roti jala mould looks almost like a miniature watering can but with multiple spouts pointing downwards. They come in plastic and brass. 

Now if only roti jala brass mould makers had more passion and some desire for perfection they could make this very elementary kitchen tool look quaint, pretty and charming. Like the roti jala itself. And I would have a pretty collection.

Unfortunately the workmanship was as rudimentary as a tool from the bronze age. :(


2 cups flour
2 eggs
2 cups minus 2 T thin coconut milk (the consistency of skimmed milk)
1 tsp salt
1 tsp tumeric powder


Note : you may have to adjust the consistency of the batter to make it thinner by adding water a tablespoon at a time if you find that it is too thick to flow out from the spouts smoothly. 

Sift flour into a medium bowl. Add salt and tumeric powder. Break 2 whole eggs into the flour and pour in half the coconut milk. Mix with a whisk adding the remainder of the milk slowly until the batter is smooth and free of visible lumps.


Pour the batter through a fine sieve into another bowl to ensure a completely lump free and smooth batter. This is essential otherwise you may find that the spouts may get clogged by tiny lumps of undissolved flour. Pour into a jug for easy handling later.


Heat up a cast iron griddle or a heavy non stick pan. Swipe some oil on its surface using a kitchen paper folded into a pad. Let the surface heat up again and lower the flame to small-medium.


Place the roti jala mould on a flat and wide bowl so that it stands upright and will not topple over. Pour the batter from the jug into the mould about halfway up the mould. 


Bring the mould and its supporting bowl near to the griddle and lifting the batter filled mould, by holding it over its top with all five fingers rather than by its handle, quickly make small circles over the griddle by twirling your wrists clockwise and at the same time moving your hand  along so that you will be forming a larger circle made up of those small circles. The final small circle will be in the centre. The first piece will always be sacrificial.


Let the crepe cook and firm up. About 1 -2 minutes. 


When done remove the crepe with a spatula and place on a flat plate. These crepes are usually about 8 inches in diameter. 

Fold the crepe or roll it up as you like. I usually do this when I have another crepe cooking on the griddle.

Repeat the process until all the batter is finished.

This is traditionally served with a curry or lamb/mutton rendang or a beef rendang.


Roti jala literally translated would be 'net crepes'. Simply because the word lace does not exist in the Bahasa vocabulary. So the closet description of its likeness in Bahasa would be net which I believe it resembles more of anyway. 

But lace sounds prettier. And I'm a sucker for prettiness. That's how shallow I can get.

And the fineness of a roti jala depends very much on the size of the spouts and the smooth flow of the batter. 

Many roti jala makers in the old days take pride in each piece appearing as lace-like or as net-like as possible. I doubt mine would pass the test.


I don't want to bore you, and I'm no physicist, but in making these roti pressure from the amount of batter in the mould does matter in getting a fine or coarse 'lace'. So adjust the amount accordingly. 

The height from which you hold the mould above the griddle matters as well. Not too high or the batter will drop in polka dots and too low it will give you a thick line. Adjust accordingly.

If you have pained and suffered this post I will now reward you with another photo. You're welcome.


Friday, January 8, 2010

FISH FLOSS ~ SERUNDING IKAN


When a warm tropical thunderstorm ceases I'm happy. I feel as fresh as a cold, squirmy fish soaking in a sharp, chilly lake in the lush, mountain jungles of Borneo. With a camera. Snapping cheerfully at my bowl of fish floss. Knees in a puddle, slipping about on wet leaves.

It's the after rain feeling I'm having now. A little bouncy, blithe, light and gurgly. Its the ions. You know ~ the negetive ions~.


And strangely enough my fish floss look almost like fish food. Fish food fit for a Fish King. Or for the Queen of Fish. 

That's how gurgly I'm feeling right now.......pheash forgive me.


Tuna is what I used. 3 whole tunas, filleted, skinned, poached and crumbled. And spiced up with some chillie, coriander seeds, onions, garlic, ginger and tumeric. 


It's an appetizer, a side dish, a sandwich filler. It can be eaten as a topping for fried rice, with steamed glutinous rice or with bread for breakfast or as a snack. I love it. It's one of my favourite appetizers. If only it requires less time to make and if it lasts longer around the house.


This is one of those childhood food that I remember fondly of but rather vaguely because it was always presented to us or bought for special occasions but never made.


The light, airy flossed meat, fish or chicken that I remember is not something one can achieve at home. It usually looks like it has been shredded into strands and then beaten to a pulp until it's looks light and fluffy. Like it was done by a machine. Or a maniac.


But if you make it at home it will almost always look a little grainy not light and floss like.


Now..... Zurin here didn't want that. So to achieve that lightness that she does so covet I pulsed the cooked fish floss in the food processor until the little balls of fish floss became fine, light and airy. 


I thought it looked much better. You're welcome.


The recipe..................


650 gm of cooked fish meat (tuna, mackeral or any meaty fish) I used 3 whole tunas about 12 inches from tip to tail. You could also use an equal amount of minced beef or chicken.

6 medium onions
4 garlic
1 inch ginger
1/2 inch galangal
2 stalks lemon grass (white part only)
3 T coriander seed, pounded coarsely
1 T or more chillie paste (bottled or fresh)

2 tsp tumeric powder 
1 T sugar

250 ml coconut milk or cream
5 T any vegetable oil

salt

Poach the fillets of fish in pan of water until cooked. Drain and let cool. Remove bones and crumble the meat until it is as fine as you can get it....like breadcrumbs. Keep aside.


Peel onions, garlic ginger, galangal. Slice the white part of the lemon grass. Place them all in a food proccesor and process until quite fine.


Heat up the oil in a thick based medium pot. Saute the processed spices, while adding the chillie paste, tumeric powder and pounded coriander seeds, until fragrant and the paste turns a darker colour. About 10 to 15 minutes.


Put in the crumbled fish meat, pour in the coconut milk or cream and mix well. Let it cook on the stove on small to medium heat, stirring now and then to prevent burning. Ad sugar and salt. Stir and mix.


The mixture should not have any sauce or gravy but should be quite like a thick wet paste. Cook until it becomes slightly drier and it is no longer too wet.


Transfer the mixture to a large baking tray that has been lined with foil or baking paper for easier cleaning.

Bake in an oven at 170 C, checking and stirring every 15 minutes until the fish floss becomes golden all over. 


Stirring the floss as it bakes is important so that the floss browns evenly. I didn't time the baking but I think it took about an hour. 


Remove and let it cool completely. Pour half the floss into a food processor and pulse until the floss becomes fine, light and airy. Do the same for the rest of the floss.


Store in an airtight container and in the refrigerator.


Top or Snack.


LinkWithin

Related Posts with Thumbnails